RV Life Entrepreneur Podcast: Navigating the Growth Phase on the Entrepreneurial Highway – RVE #3273/16/2024  Is your business in the midst of a growth phase? Navigating expansion, especially from the nomadic perspective of the road, demands not only immense effort but also a focused mindset and a strategic approach.
In this captivating episode, Rose Willard engages in an insightful conversation with Robert & Tosha Lackey, the visionary couple behind Bison, a motorcycle safety gear business, as they run their business full-time from the road. Join us as we uncover the intricacies of their strategic move to grow Bison geographically, exploring how the Lackey’s seamlessly blend their passion for motorcycles with the freedom of the RV lifestyle. From the innovation in safety gear to tackling legal complexities, scaling on the move, and finding equilibrium in work, life, and homeschooling, this episode provides invaluable insights for fellow entrepreneurs navigating the challenges and triumphs of life on the road. Whether you’re an aspiring entrepreneur, an RV enthusiast, or simply hungry for a story of resilience and innovation, this episode promises inspiration and practical wisdom. Buckle up for a deep dive into the exciting and pivotal phase of Robert and Tosha’s entrepreneurial journey, where the road becomes the backdrop for business growth and personal adventure!
0 Comments
In our last blog, I reviewed the Brake Buddy Select 3 unit which helps bring our flat-towed Ford Ranger to a stop when we apply the brakes on our motorhome. Since the release of that blog, many of you have reached out for more information about our towing setup - specifically, our Roadmaster 522 Falcon All-Terrain Tow Bar! You ask, we give.
At the time of this writing, we’ve put over 50,000 miles of pulling duty on our Roadmaster bar in the past four years! We’ve towed over tens of thousands of miles of flat highway, but we’ve also put it to the test with some serious articulation behind our Thor Outlaw Class A motorhome, exaggerated more so thanks to said vehicle’s long rear overhang. Speaking of articulation, one of the standout features of the All-Terrain Tow Bar is its ability to adapt to different towing situations. With a 6,000lb. rating, this bar is a great choice for towing anything from a small car to a mid-size truck. In fact, it handles the duty of lugging our Ranger around just fine. Need more capacity? The Roadmaster 576 Sterling All-Terrain Tow Bar offers 8,000lbs. of towing capability, while the Roadmaster 422 Blackhawk 2 All-Terrain Tow Bar is rated for 10,000lbs! The design includes quick-disconnect mechanisms that allow for easy attachment and detachment of the towed vehicle, making the entire process much simpler and more efficient. Even better, unlike other tow bars the mechanism is easy to get unbound should you need to disconnect on uneven ground or with the rig turned hard. On the topic of connecting the bar to the vehicle, Roadmaster offers various options depending on the vehicle you’re planning to tow. If you’re planning to tow a Jeep Wrangler, for instance, the Roadmaster 521448-5 Direct Connect Style Baseplate bolts directly to the frame of the Jeep using existing holes. Conversely, our Ranger uses the Roadmaster 524431-5 Direct Connect Tow Bar Baseplates which replace the factory tow hooks and again uses those factory mounting points. Quick-connect “U-joints” are included with the baseplates. These U-joints remove from the baseplates very quickly by pulling a pin and rotating them 90 degrees. To install, simply insert and twist to lock them in place! In addition to its versatility and ease of use, the All-Terrain Tow Bar also provides excellent stability and control while towing. The design includes a unique non-binding joint just in front of the arms which allows the whole unit to twist and flex independently. This is especially important when driving over rough terrain, as it helps to reduce the risk of damage to either the towed vehicle or the towing vehicle. Once disconnected, the whole tow bar flips upwards, locks into position and drops down to one side or the other to stow while not towing. This is convenient but I must say it’s the one area where our Roadmaster has started to show fatigue and wear. Although the joint plates and the rest of the unit are made with high-strength quality steel, the plates bear all of the weight of the bar when flipped over into the stowed position. When the motorhome is driven with the bar flipped into stow mode for some time, the plate bends and the bar sags downward. Keep in mind this does take some time and has only become prevalent in the past year or so. The only other notable aging is a bit of rust on the coupling hardware. The gray powercoating on the unit is very durable and the polished telescoping bars still work nicely despite never being lubricated. Overall, the Roadmaster All-Terrain Tow Bar is an outstanding piece of equipment that is both durable and versatile. It’s been a joy to use and completely trouble-free over our long duration of use. Whether you're towing a vehicle on a long road trip or navigating challenging off-road terrain, this tow bar will give you excellent stability, control and reliability making it a must-have for any serious RVer or adventurer. When it comes to towing a vehicle behind your RV, the information gathering process can be taxing and overwhelming. You need to choose a tow bar and corresponding tow bar brackets (we went with the Roadmaster All-Terrain system and LOVE IT!), figure out your tail light diodes and - maybe most importantly - decide which auxiliary braking system you want to use. For the purpose of keeping the topic simple and reserving your sanity, we’re going to focus on that last component! What is the Brake Buddy? Built right up the road from my hometown in Olathe, Kansas, the Brake Buddy Select 2 unit is a portable, easy-to-use auxiliary braking system designed for towed (or, as they’re commonly referred to in the RV community, “toad”) vehicles. It is designed to help improve the braking performance of a towed vehicle and ensure that it stops safely and efficiently when the towing vehicle does. Think of it like trailer brakes: You’ve got 3000-8000 lbs of dead weight dragging along back there and without dedicated brakes, you’re asking your tow vehicle’s brakes to stop the whole package. Not to mention the danger of momentum swinging the trailer or toad around should things become squirrely. It’s a simple machine: When braking pressure is required, the Brake Buddy actuates a pneumatic cylinder which presses the brake pedal on the toad. 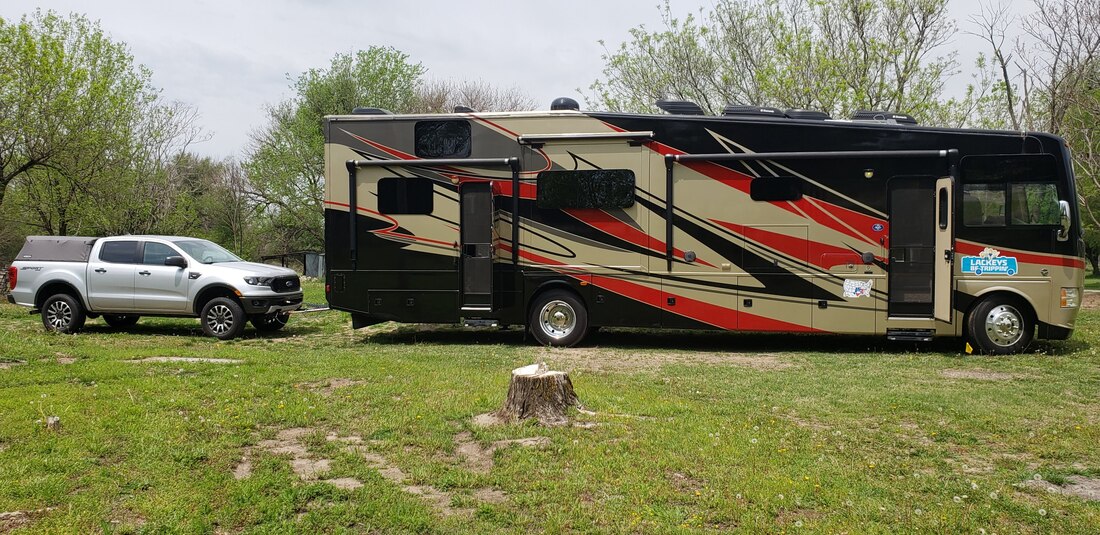 What makes it unique? One of the standout features of the Brake Buddy Select II and Select 3 units are their portability. Unlike permanently-affixed systems, Brake Buddy units are removed when not in use. This can be both a blessing and a curse depending on your needs. The good news is the unit is compact and lightweight, making it easy to install and remove as needed. It also has a wireless remote control, which allows for easy activation and deactivation of the system. We place the remote right on our dashboard and stow the Brake Buddy in a small undercarriage compartment when it’s not in use. Another notable feature of the Brake Buddy Select II is its ability to self-diagnose any issues or malfunctions that may occur. This can help to ensure that the unit is working properly at all times and that any problems are identified and resolved quickly, which is a great thing since we had a lot of issues with our first unit! 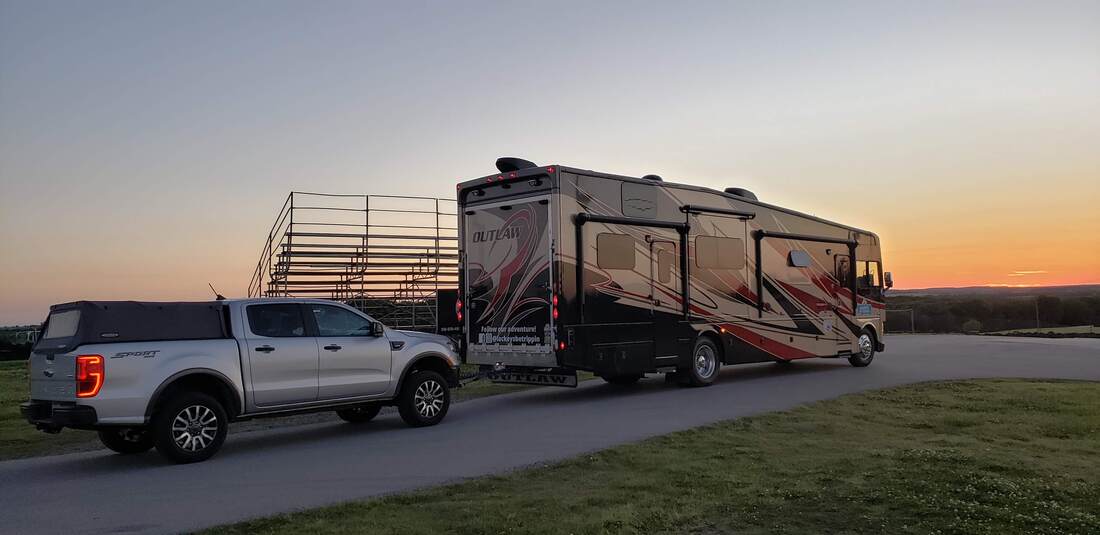 Reliably unreliable Have you ever owned something that you just knew was going to let you down at the worst possible time? In our RV life, we have had two of those: Our Onan QG5500 generator and the Brake Buddy Select II! Issues with our first Brake Buddy unit began after about a year of use when we got an error immediately following a very hard stop. I pulled over and looked inside the housing where I quickly saw that the air line from the pump to the cylinder popped off. There is no real clamp on these hoses, just small zip ties. Leary of voiding my 3-year warranty, I called Brake Buddy and explained my situation. I could not open the unit myself, I was told. As frustrating as it was to mail my unit back for such a trivial issue that I could have fixed in five minutes, rules are rules and I wanted to keep my warranty intact. Besides, Brake Buddy shipped us a loaner unit which meant we just threw ours in the box and sent it back with the return label! It took several weeks to get our machine back but the loaner was much appreciated. We got a few months’ worth of use out of the newly-repaired unit before the same thing happened again - this time while traversing the Rockies. If you’ve ever driven down a mountain in a large vehicle you understand the importance of brakes. Suffice it to say, this was a stressful situation. This time when I called Brake Buddy, I was pretty adamant that I needed to fix the issue myself. After all, we were on top of a mountain and I wasn’t going to be stationary for a long time to receive and ship units back and forth. The technician reluctantly agreed and I was able to repair the problem in just a few minutes by removing the screws around the bottom, splitting the case open and affixing a new zip tie to the small air hose. While I was in there, I looked around at the components to make sure nothing else needed attention. What I found was the mounts on the air pump had fallen apart allowing pretty much everything in there to just move around. This wasn’t helping keep the air lines in place. I figured I would visit the Brake Buddy HQ once we got back to Kansas to see if they could fix the mounts. Turns out I’d have even more reasons to visit them in person because just a few weeks later the control panel began displaying errors. Then the air pump began to fail, eventually dying altogether after a few more uses. At this point we were back in the central plains so I just stowed the Brake Buddy and drove back to Kansas without toad brakes. By this time I was pretty darn frustrated but I scheduled a visit to the Brake Buddy HQ. It’s a quick drive about an hour north of Wichita to see them in person but I hoped to get this resolved once and for all! Brake Buddy did tell me they don’t normally just have people walk in, but they seemed keen on getting this situation resolved for me and made an exception which I appreciated. After an hour of waiting, the technician brought the unit to me and said it was fixed. Not wanting to take his word and waste a trip, I took the Brake Buddy out to the truck, hooked it up and surprisingly (or unsurprisingly, I’m not really sure) - the same error message appeared! I stomped back in, handed the machine back to the tech and sat in the waiting room. He was quite apologetic and after ten or fifteen minutes he returned with a brand new Brake Buddy Select 3 unit! He said they needed to fix so many things on my Select II that it would be better to just replace it altogether and all they had were Select 3 units in stock. Admittedly, my faith in this company’s products was at an all-time low at this point but I thanked them for their service and accepted the new product. 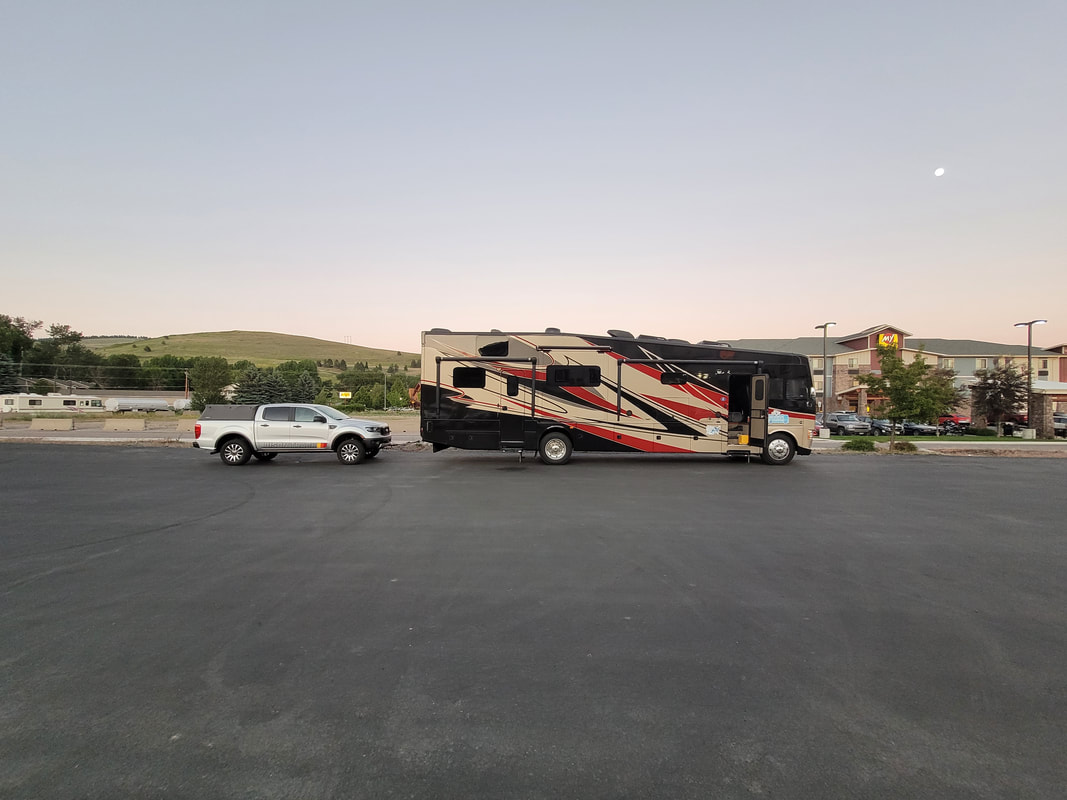 Healing wounds with time… and a new machine Having used the Select III unit for a couple years now, I can tell you it’s been a much more reliable product. To tell you the truth, the Select II and Select 3 are basically the same items. As far as I can tell, the only differences are that the Select 3 has adjustable height “feet” and a new “Quick Lock” clevis which is supposed to make attaching the rod to the pedal easier. I personally don’t care for this new clevis, in fact I swapped my Select II clamp onto the Select 3 in place of the Quick Lock. In addition, the controller and all settings are identical between the Select II and Select 3, so I retained my old controller and preferences. Braking force and consistency is also identical between the models. My real hope is that the internal components have been upgraded from the Select II model, but I haven’t disassembled the Select 3 to find out if that’s the case. 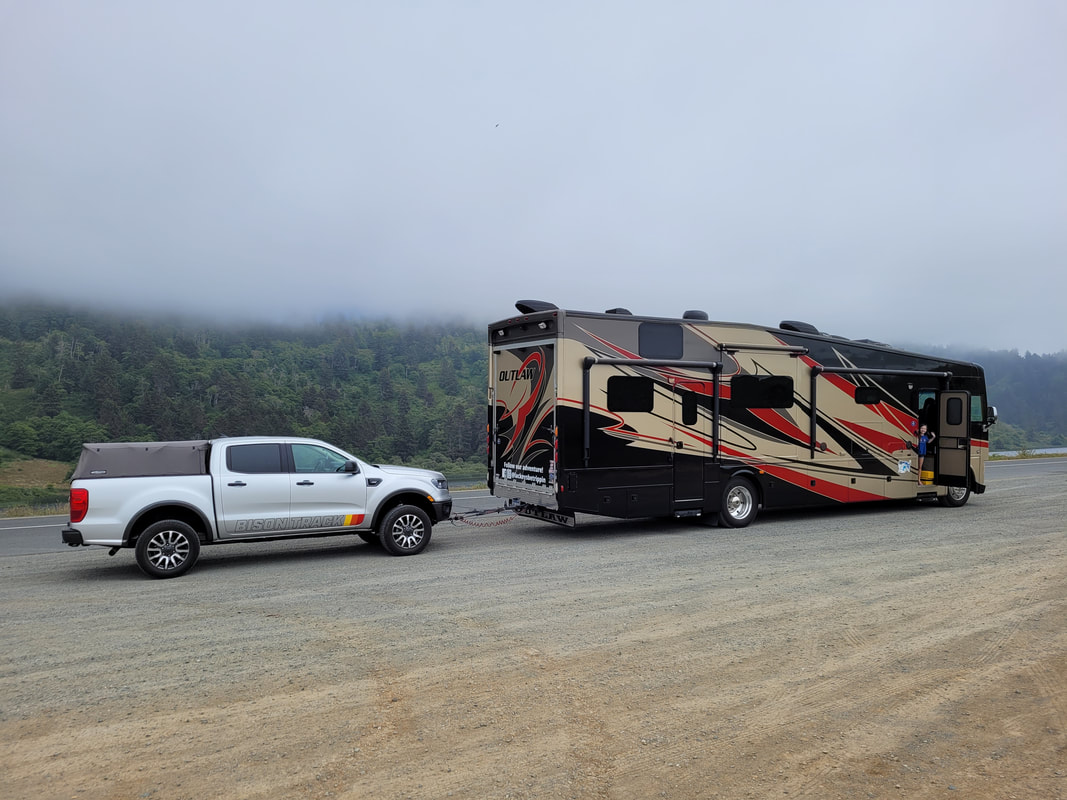 Final verdict Experts in the field of RVing and towing have long praised the Brake Buddy Select 2 unit for its performance and ease of use. It has also been recommended by several RV and towing publications as a top choice for auxiliary braking systems. As for us? Our personal experience with the Brake Buddy may have started out poorly but I have been much happier with our Brake Buddy Select 3! Honestly, had it not been for Brake Buddy’s warranty and technical support, these closing paragraphs may have read much differently. Given the overwhelmingly-positive feedback from users online, I’m inclined to say we just got a lemon unit. When the product does work (which the Select 3 has), it works well and provides a lot of reassurance. Overall, if you are in the market for an auxiliary braking system for your towed vehicle, the Brake Buddy Select 3 unit is definitely worth considering. Its portability, ease of use, and effective braking performance make it a top choice for many RVers - including the Lackeys!  Want to stress me out? Ask me to make a meal for a party of six or more on a camping grill. Want to give me a breakdown? Tell me I have to clean up the cooking area afterwards! Despite what the above paragraph might have led you to believe, Tosha and I actually love hosting and entertaining guests at our campsite. We offer seats and stir up conversation without batting an eye - all while keeping our guests’ cups full of the beverage of their choice. When it comes to the cooking and cleanup part? We draw straws to see who gets that one. 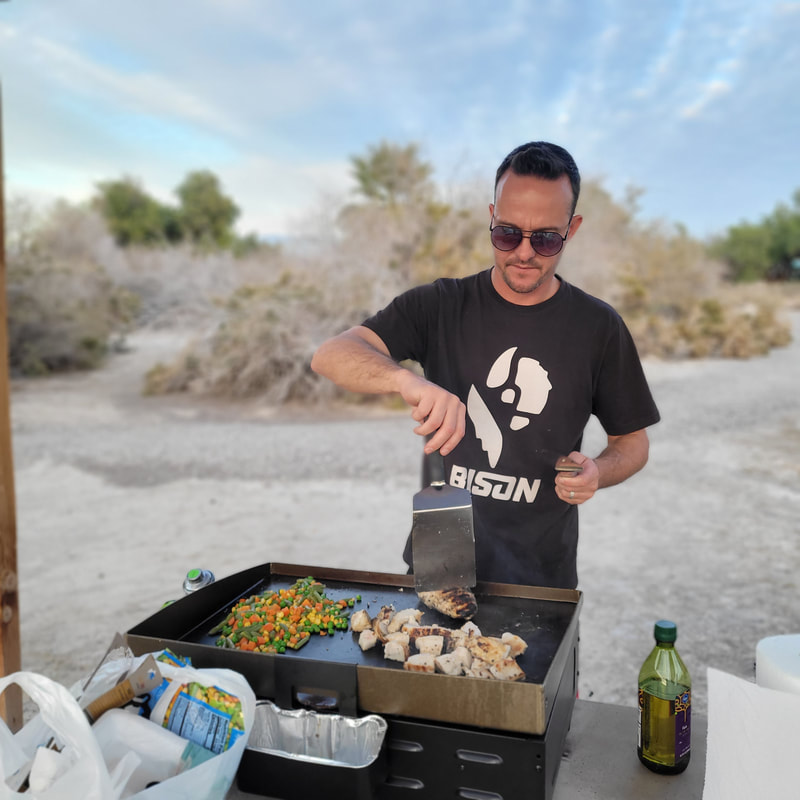 The challenge of RV cooking I can’t speak for Tosha but I personally stress about cooking because I have a ton of trouble coordinating the timing and temperature of multiple foods. That issue is made worse in an RV, where the cooking appliances are generally smaller and less accurate than residential units. The easy answer to this problem is to carry an outdoor grill as you travel in your RV, but this creates challenges in and of itself as space and weight come into play. By far though, the thing we both hate the most about cooking is cleaning the cooking area and utensils! For three years, we carried a small Coleman Gas Camping Stove in our lower compartment. It did the job, it was efficient and it’s lightweight to boot. A small bottle of propane yielded several days’ worth of meals, albeit with the occasional (okay, frequent) grease fire. Despite the efficiency and convenience, I was never truly happy with the little stove for our needs. The small cooking surface only accommodated four burger patties and the single burner control was agonizingly hard to adjust (basically either “off” or “fire”). The thing about this Coleman grill was that it was always absolutely gross. Cleanup was not easy nor did I ever look forward to it. At some point over the past year or so I simply gave up on cleaning the grill and started chucking it into the undercarriage bin after a quick exterior wipedown. Not ideal but again, we used it quite a lot. (Note: If you’re a van lifer or weekend camper this might be a good starter appliance for you, so we’ve included a link to purchase the Coleman grill.)  The day I found a better solution We were in Ft. Lauderdale at Yacht Haven RV Resort in February. I’ll never forget this because it was my birthday and we met our now-best RV friends, Ken and Amanda Freick, in the pool that day! The Freick’s are GREAT hosts and they graciously invited us over for some food cooked on their “Blackstone”. At the time, I had no idea what a Blackstone was but it sounded fancy and we’re always game for some home-cooked food! Once at the Freick’s Class A Holiday Rambler, Ken unveiled the Blackstone. He explained how simple and awesome this griddle was: A single, solid cast-iron cooking surface with two burners below. Cleanup was as simple as pushing the “big stuff” into the back of the griddle and down the “drain” with a scraper tool. At the end of the day or weekend, just dump the catch tray or better yet, pull the foil liner out and replace it. I watched as Ken whipped up some breakfast food: peppered bacon on the left side, diced potatoes on the right. The bacon grease got into the potatoes a bit. “Oh we’re having dirty potatoes today!”, Ken said. (Since then I’ve learned that “dirty” food means it’s seasoned a little with the food prior - usually a greasy food like bacon.) A handful of shredded cheese over the taters melted perfectly while some charred on the griddle surface. These things looked epic. I grabbed a rogue tater off the griddle and tossed it into my pie hole, instantly searing my tongue and the roof of my mouth. The second-degree burns were totally worth it. These dirty potatoes were BOMB! As Ken shut the griddle down I couldn’t help but cringe at the crusted cheese and bacon bits baked onto the surface. This looked like it was going to be hell to clean up but Ken had everything scraped off with a few strokes of the scraper blade! A quick spray of olive oil on the surface before closing the lid and walking away. “Lunch is going to be awesome with that breakfast seasoning.” Over the next few days the Freicks spoiled us and cooked a lot of meals on that Blackstone for us. I couldn’t believe how easy it was to make such great food - but the fact that there was basically zero cleanup made this seem too good to be true! 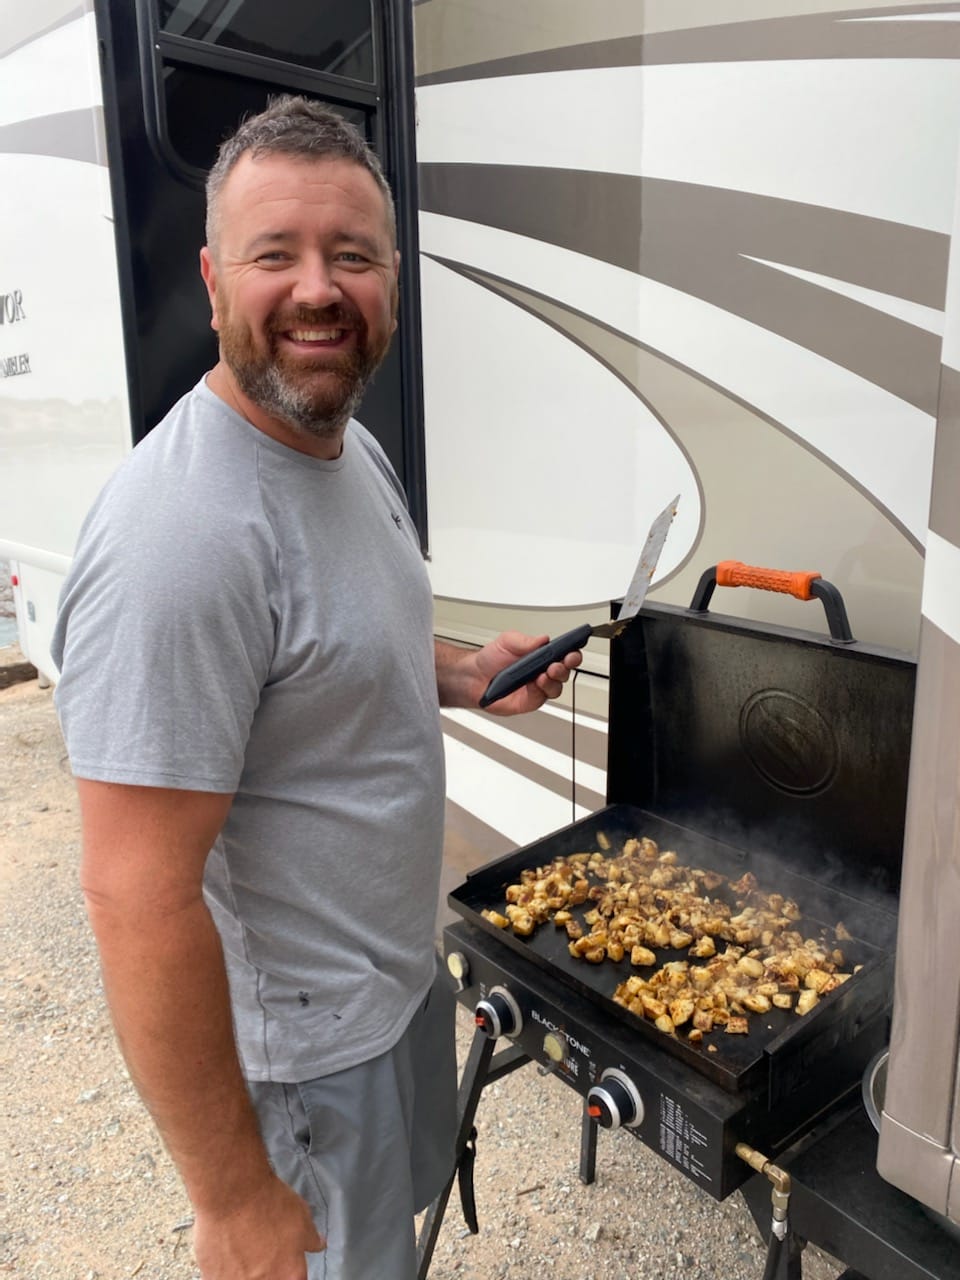 A gift for the family We went the rest of the year limping along with that poor, filthy little Coleman camping stove but every time we grilled out we always thought about the Freicks’ Blackstone. Finally, in November I found an excellent deal on the 22” Blackstone and Camco Olympian Portable Table on a Black Friday sale. It just so happened that Tosha and I were prepping for a three-week van life trip in our Sprinter and we needed a good gas cooking option, so I ordered it right away. Merry Christmas to us! I unboxed everything as soon as it arrived and unfolded the Camco table. To my surprise, the table is super sturdy considering it’s lightweight! It is also incredibly easy to set up and stow with one simple pull or push motion. Four convenient folding hooks on each of the side tables are perfect for hanging utensils and rags. At 32 pounds, the Blackstone 22 isn’t exactly light but the table didn’t falter in the slightest when I placed the griddle upon its pedestal. In fact, it feels very sturdy even during heavy scraping. Somehow it doesn’t even manage to feel top-heavy. Months after my first use, I continue to find myself amazed at this little table! Just be advised, the particle board side table tops are NOT waterproof. After a night in the rain, the white surface started to lift around the edges where water soaked in. Not a big deal, and it’s been noted for the future. Enough about the silly table. What about the Blackstone, Rob?! Well, let me tell you, this isn’t something you just get out of the box and start cooking on. Just like a cast-iron skillet or pot, there’s an art to “seasoning” the metal. Blackstone recommends coating the surface lightly with oil and burning it off repeatedly. You can actually see the surface change colors as you get closer to being able to cook on it. After that initial “break in”, you truly will find that the meals will get tastier and tastier and stick less to the surface the more you cook on it! 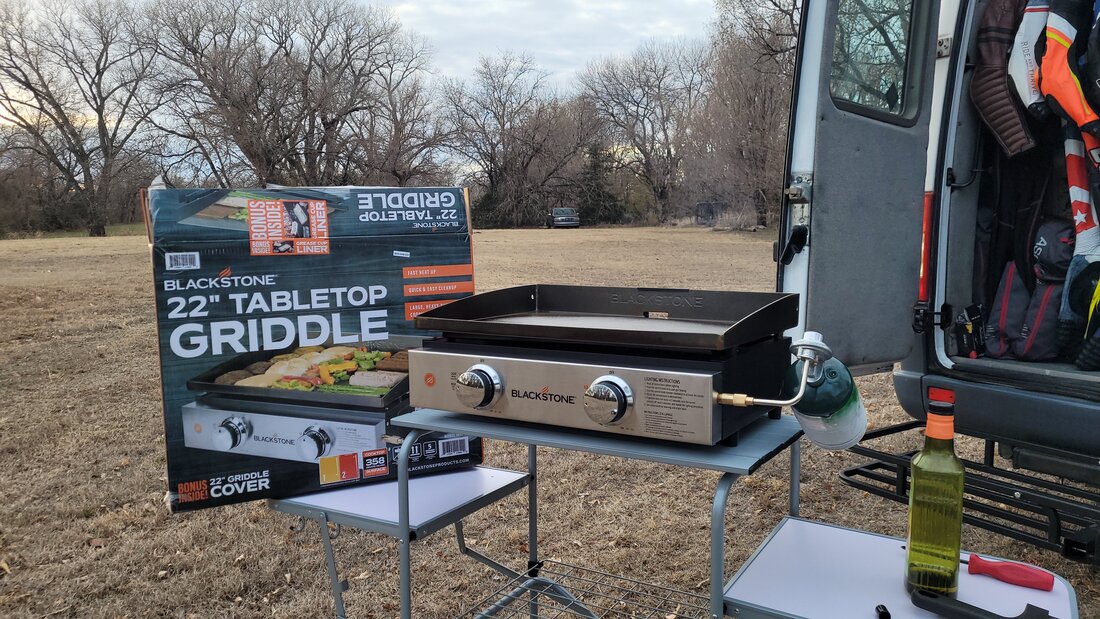 Real-world testing in the middle of nowhere The griddle was seasoned just in time for us to load up the van and hit the road for the Southern California desert. We packed a cooler full of meat and cheese and crossed our fingers that the Blackstone would be everything we hoped for. If it wasn’t, we’d be eating a lot of cold sandwiches and beef jerky. Once in California we set up camp at the Salton Sea Recreation Area, an oasis in the desert just east of Palm Springs with a bit of a dark history (more on that to come in a future blog). Not only were there no other people around, there were no stores close by to gather supplies. I set up camp and fired up the Blackstone using one of the four small camping propane bottles we’d packed for the trip. Our chicken fried rice dinner was okay (I burned the chicken and undercooked the rice on the campfire), but we were starving and living out of a van, so really it was excellent. The next morning for breakfast I sliced up some potatoes and peppers. Potatoes take a while to cook on the uncovered Blackstone surface, but I noticed that by the end of the meal the surface temp seemed low. Surely I wasn’t running low on gas after just two meals? Well, lunchtime confirmed my suspicion. After just 2.5 meals’ worth of cooking time, I’d expended a bottle of gas. We’d experienced our first drawback to Blackstone life: It ain’t very efficient for camping. We continued to burn through our gas bottles as we explored the SoCal desert but with each meal I better learned how to manage the cooking surface and temperature. At the same time, the griddle was seasoning nicely. The meals got better but most importantly - set up, clean up and tear down were so simple that I never dreaded cooking. Conversely, I was enjoying it more than ever! The Blackstone and Camco table combo was proving to be a home run. 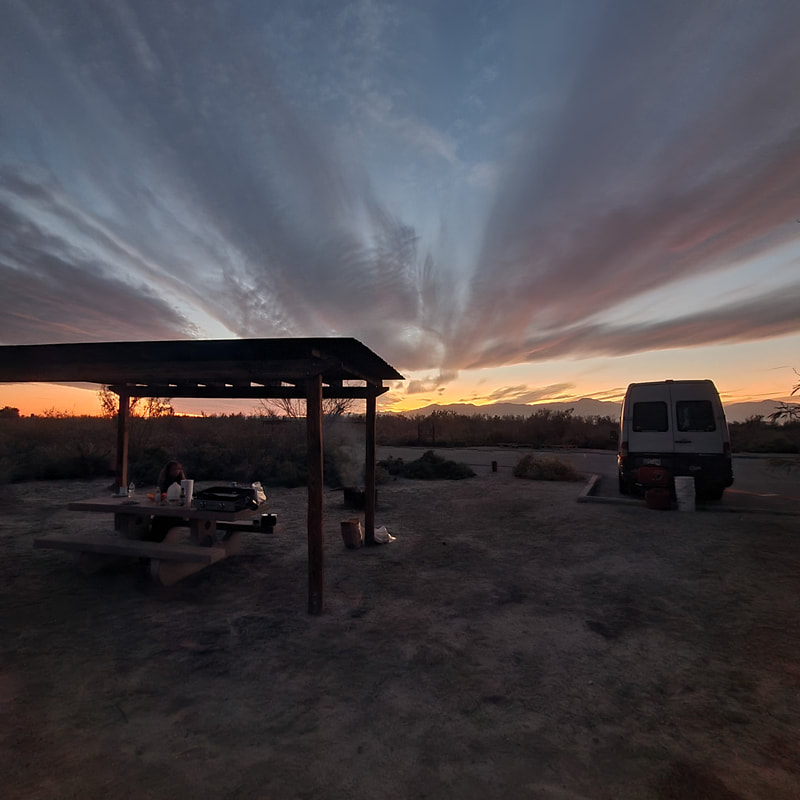 Gas relief After blazing through five or six of the small camping bottles, I started to realize these things weren’t cutting it for Blackstone duty. The final straw came as I was cooking breakfast during an event at Chuckwalla Raceway in Desert Center, CA. I made a quick batch of bacon and eggs and got Tosha fed before starting mine. A friend came by and struck up a convo but I could see she was eyeing my bacon and eggs. I sensed that she hadn’t eaten so I offered them up to her - after all we had plenty of food. She happily accepted, so I plated her food and tossed the last batch onto the griddle for myself. By this point I was absolutely starving. Then the gas ran out. And we had no more. After that morning of disappointment, I broke down and bought a 5-gallon propane bottle and a Blackstone 5-gallon adapter hose. For whatever reason, the Blackstone seems a lot more efficient and happy on the big bottle of gas. Since switching to the 5 gallon about a month and a half ago, we have cooked a LOT of meals on the griddle and still have gas in the tank. I did notice that the small bottle would freeze when running both burners on high, especially as the bottle got low. My theory is that this decreases the efficiency of the gas, so even though the bottle might still be ¼ full, it won’t put out the BTUs necessary to heat the griddle. Then again I have a GED not a Masters, so I could be way off. Regardless of the reasoning, the Blackstone truly needs a 5-gallon or larger tank if you want to avoid frustration every few meals. Since we didn’t have room in the Class A to stow a 5 gallon tank, I bought a trailer hitch rack for the back of the Sprinter and tied the bottle to that during travel along with our 2200 watt generator and gasoline jugs. It’s worked perfectly - in fact I recommend the hitch rack to anyone in need of a little (or a lot of!) extra space in their van, truck or RV! Even though we found a solution to lug the 5 gallon bottle around, it’s not ideal. My next step will be adding a propane line tap and hose to our RV’s on-board 30-gallon propane tank so I can simply connect the Blackstone to the rig and fire it up without any bottle at all! 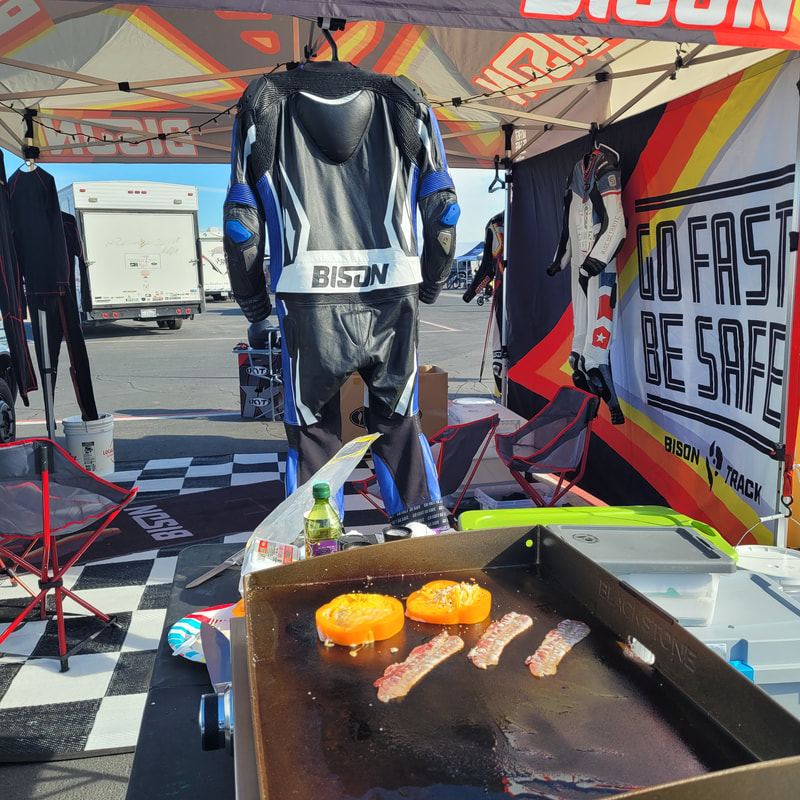 Would we do anything differently? The 22” Blackstone has been a game-changer for our family especially when hosting guests or parties at our campsite but there are a couple of things I would at least consider if I had to do it again. First, I must tell you there is a covered version of the 22” griddle called the Blackstone “On The Go” model. It’s touted to be easier to carry around and more weatherproof since it has a metal lid. I passed on this model since it cost significantly more than the standard Blackstone and mine came with a canvas cover anyway. Turns out, I could really use that lid when I’m cooking things that need to be covered. The lid would help with efficiency and allow me to better cook some dishes. The good news is I could always use a cooking dome or even add a lid to my Blackstone using the pre-drilled holes. Do I regret not getting the On-The-Go? Not really. Ironically, the lid on the “OTG” model adds weight and takes up quite a bit more space than the standard model. What about the surface size? Blackstone offers options ranging from a 17” single-burner model to a 36” four-burner beast. I can tell you that I’ve cooked A LOT of food in one evening on this two-burner 22” griddle and the dual temps have come in quite handy. Those who have the 17” unit seem to have an overall consensus that they’d get the 22” model if they had to do it again. For a couple in a van or for camping use, the 17” is probably an excellent choice and it will use a small bottle more efficiently. If you have the space and you’re cooking for a family, spring for the 22” and connect it to a larger tank. What about the Blackstone griddle cart? It’s a nice, robust rolling cart but honestly it’s not ideal for RV use. If you’re staying stationary for long periods of time and leaving the griddle outdoors it’s an option to consider, otherwise you’re much better off with a lighter, portable and more functional folding table option like our Camco Olympia. In closing, we can’t recommend a Blackstone enough! Our prior “favorite RV appliance”, the Ninja Foodi, does great things but requires a lot of electrical power to make food which isn’t always ideal in a motorhome or trailer. Best of all, the griddle cleans up with a quick scraping, a spritz of oil and a wipe down of the outside with a disposable degreasing scrubbing towel (which I use for everything). The Blackstone truly is the best cooking tool you can buy for RV or van life and it’s given me a new love and appreciation for cooking! Now if you’ll excuse me, some dirty, cheesy scrambled eggs are calling my name.
The Ninja OS301/FD305CO Foodi 10-in-1 Pressure Cooker and Air Fryer with Nesting Broil Rack is a versatile kitchen appliance that is perfect for busy individuals who want to prepare healthy and delicious meals in a short amount of time. Here are some of the reasons why I would recommend this appliance.
Firstly, the Ninja Foodi combines the functions of a pressure cooker and an air fryer, allowing you to cook a wide range of dishes with ease. With the pressure cooker function, you can prepare stews, soups, and other one-pot meals in a fraction of the time it would take using traditional cooking methods. The air fryer function, on the other hand, allows you to fry, roast, and bake your favorite foods using little to no oil, making them a healthier alternative to deep-fried foods. Secondly, the Ninja Foodi comes with a nesting broil rack that allows you to cook multiple layers of food at the same time. This is particularly useful when cooking for a large family or preparing a meal for a dinner party. The nesting broil rack also helps to save space in your kitchen by allowing you to cook more food in a smaller area. Thirdly, the Ninja Foodi is easy to clean, thanks to its non-stick ceramic-coated pot and dishwasher-safe parts. This means that you can spend more time enjoying your meals and less time cleaning up afterward. Finally, the Ninja Foodi comes with a range of useful features, including a digital timer, temperature control, and a keep-warm function, which help to ensure that your meals are cooked to perfection and are ready when you are. Overall, the Ninja OS301/FD305CO Foodi 10-in-1 Pressure Cooker and Air Fryer with Nesting Broil Rack is an excellent investment for anyone who wants to save time and cook healthy, delicious meals at home. With its multiple functions, nesting broil rack, and easy-to-clean design, it is an appliance that will quickly become a staple in your kitchen.
If you're a coffee lover looking for a compact and convenient machine to make delicious espresso at home, the Nespresso Essenza Mini Espresso Machine by De'Longhi is definitely worth considering.
One of the standout features of this machine is its size. The Essenza Mini is incredibly compact, taking up very little counter space. Despite its small size, it is able to deliver excellent quality espresso with the help of Nespresso's high-quality coffee capsules. The machine is very easy to use, with just two buttons for espresso and lungo drinks. Simply insert a capsule, select your preferred drink size, and the Essenza Mini will do the rest. The machine also heats up quickly, so you can enjoy your coffee in no time. Another advantage of the Essenza Mini is its stylish design. The machine is available in a range of colors to suit any kitchen décor, and its sleek and modern appearance will undoubtedly impress your guests. Maintenance is also very easy with the Essenza Mini. The machine comes with a removable water tank and drip tray for easy cleaning, and its automatic energy-saving function helps to conserve electricity. Of course, one of the main factors to consider when purchasing any coffee machine is the quality of the coffee it produces. In this regard, the Nespresso Essenza Mini Espresso Machine by De'Longhi certainly does not disappoint. The machine's 19-bar high-pressure pump ensures that each cup of coffee is rich, creamy, and full of flavor. In conclusion, the Nespresso Essenza Mini Espresso Machine by De'Longhi is an excellent choice for anyone looking for a compact, easy-to-use, and stylish espresso machine that delivers high-quality coffee. Whether you're a coffee aficionado or simply looking to upgrade your at-home coffee setup, the Essenza Mini is definitely worth considering. Weird things happen at 4 am. Last night I couldn’t sleep. I’ve been having a lot of anxiety lately and every time I put my phone down for sleep, the anxiety reared its ugly head again. -How many sales are we going to have this week? -Have I paid all of our bills? -Did I forget to answer any customer emails? -Did I eat dinner? Those were the trivial ones (not unimportant but trivial on the scale). Then the big ones hit me. -What value am I adding to our family? -Why can’t I seem to find my joy? -Will I ever find what I’m searching for? Yep, I told you. They were big ones. Ever since I quit my job as Vice President of Finance for a marketing company three years ago, I seem to be caught in this vicious cycle: Get a big idea. Pursue the big idea. Abandon the big idea because I hit a roadblock. Decide I’m going to go back to a traditional job. Look for a traditional job. Hit a dead end because nothing I find is exciting enough and I’m either under-qualified or overqualified. Question my entire self-worth. Retreat to myself and ignore it all. Find new inspiration. Repeat. THIS IS AN EXHAUSTING CYCLE. Well, last night it hit me - at 4 am.  I am doing exactly what I want to be doing. And I need to quit torturing myself. The cycle is simply distracting me from doing everything I’m already doing just a little bit better. Who else can say these things? -I am able to travel and experience the entire country, coast to coast. -I am able to spend countless hours with my family, making memories. -I love what I do for work. -I love sharing my experiences with people. Sounds pretty perfect, right? There’s one small problem - I need to make more money. Yep, I know, pretty significant problem. But there is some good news! We have an incredible, quickly growing business that I can directly impact. We need to increase our profit margins and we’re taking some pretty big steps to make sure that happens by the end of 2022. We’ve also made a ton of progress on growing our social media following for Lackeys Be Trippin’. If we can get our YouTube channels for both Bison and LBT to 1,000 followers, we will automatically start monetizing those channels. If we can get more traffic to our website and more people to engage with our content, we can increase our Amazon Associates revenue. We are so incredibly close to making a living - off simply living! And that, my friends, gives me joy. P.S. I know you didn’t ask but here are a few ways you can help if you feel inclined! (But no pressure!)

Cliche opening alert: It was a dark and stormy night on the plains of Eastern Kansas. We rolled across the border just before midnight on a 2-lane highway. A 40 mph crosswind was driving rain into the passenger side of the rig and ensuring that I kept both hands on the wheel at all times. Every passing semi swayed our tall, relatively lightweight motorhome like a ship in high seas and left a wake of road spray that my wiper blades could only just clear off in time for me to catch glimpses of the yellow and white stripes on the road. Oh, and it was cold. These conditions represented about “Defcon 2” on my RV driver’s scale, the only thing worse being ice (which is absolutely Defcon 1). I couldn’t see, I was hydroplaning even at greatly reduced speeds, there was no moonlight and no shoulder for us to pull off to wait it out. We just had to push headlong into the monsoon and hope for the distant lights of a roadside gas station or rest area. Then it happened. “KA-CHUNK.” The wiper arms flipped past the windshield and hung off the driver’s side of the coach, moving ever so slightly as the wiper motor attempted to reign them back to their normal position. The windshield immediately became about as opaque as one of those glass-block walls that coke dealers had in their houses in the 80’s. I leaned forward and moved my head all around, trying to find an angle where I could at least find the road stripes. An oncoming semi approached, the glare of his lights reducing visibility even more. “WHOOOSH!” The truck blazed by, the fine mist of his road spray making the windshield somehow even worse. The RV grazed the rumble strip on the thin shoulder of the road. “Mr. President, we’re raising the threat level to Defcon 1.” I slowed from 55 to 45… then to 35… and 25. There was risk at this point of being rear-ended by one of these cattle trucks hurtling unfazed across the prairie at 10 mph above the speed limit, but I certainly chose that as the better option when compared to driving into one of them head-on. I committed my ultimate pet peeve and turned our hazard lights on as I continued to drive. There was still no shoulder on this highway, and any intersecting road was dirt and/or mud with no way of turning the rig around on. We were on a one-way ride to Valhalla whether we wanted to be or not. Eventually we saw the distant glow of street lights at an intersecting overpass and cloverleaf. I limped the rig along until we could pull safely onto the shoulder and brave the cold and driving rain, huddled into the cowl of the motorhome attempting to fix the wiper linkage as semi trucks blasted by within feet of me. Honestly, all I could do was laugh. A maniacal laugh, sure… but I laughed. As bad as that situation was, it didn’t hold a candle to our most recent setback. Whereas I managed to get the wipers fixed(ish) relatively quickly on the side of the road, our next big problem wasn’t so easy to address. Death by Potholes During our recent travels from Oklahoma to Washington state, we found ourselves on some pretty questionable roads but easily the worst was I-70 westbound just past the Kansas/Colorado border. Whereas the Kansas side was glass-smooth and quiet, the Colorado side went absolutely nuts. As soon as we crossed the Colorado border, a rash of mis-leveled pavement and large potholes rattled our cabinets open, woke Tosha and Edith, and as we would come to find out… sheared the passenger side wall right off the rig. Since it was dark when we hit the washboard from hell, I actually had no idea the wall was broken. I could see that the dashboard had come loose and it was bouncing, but I couldn’t see much more. The real surprise came the following morning when I couldn’t open the door to go outside for my morning walkaround. After busting my way out I inspected the latch, trying to figure out if I needed to adjust it or what else might be. Everything looked okay. I then opened the first basement door closest to the front of the rig so I could get my tire gauge out. The door opened a few inches and bound up, stuck on the edge of the panel ahead of it. At this point I knew we were in for a long day. I traced the misaligned body panels to the front fender area where - just as I suspected - the wall had broken free of the floor. The wall was resting on top of the fiberglass fender below it, bulging it outward and cracking the corners. All this pressure was twisting the body of the coach and causing all sorts of issues, but it was fixable. The problem was, I didn’t have all my tools nor did I have any workspace. I was at a loss at that moment, but thanks to a few friends in the Denver area (and the kind folks at Transwest Truck and RV in Frederick, Colorado), we managed to get Rumble fixed up in a couple of days and we were back on the road! 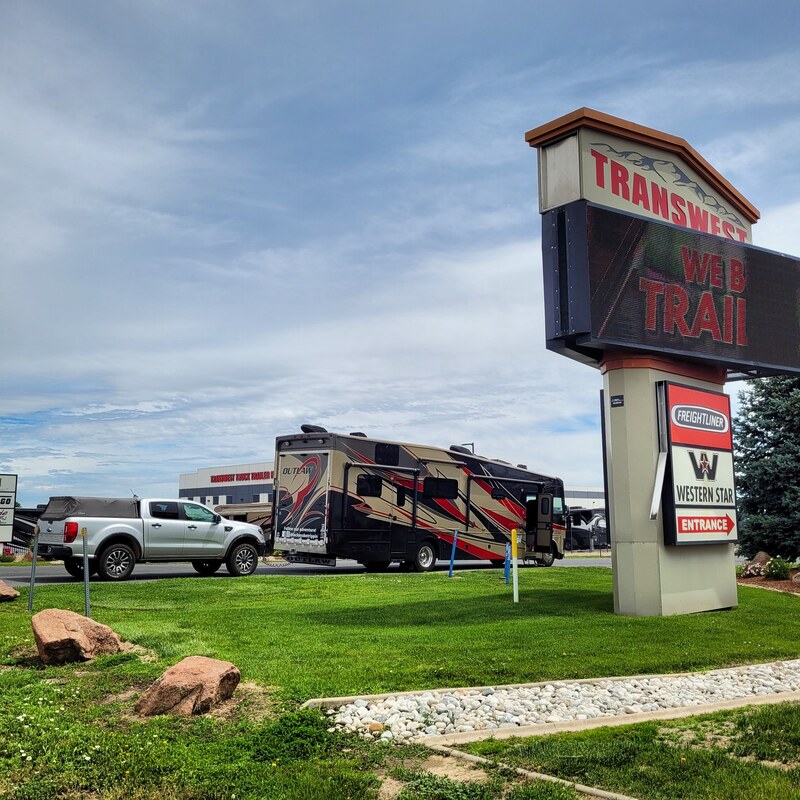 Adapt and Overcome The two stories above are just larger, more interesting examples of the type of struggles we deal with almost every day. The truth is, most RVs aren’t built with full-time living in mind. The materials and methods used in the construction of motorhomes like ours are employed with cost-cutting and weight savings in mind, not luxury and longevity. That being said, if you go into the adventure expecting some hiccups (and with a willingness to learn new things and become a handy person), you’re going to find yourself a lot more prepared and in a better mindset when things do start to fall apart. By the way, things are gonna fall apart. It doesn’t matter if you paid $10,000 or $1,000,000 for your rig. They all have their problems. To me, the hardest thing about full-timing has been keeping up with the unexpected repairs while still maintaining a brisk travel pace. I do think this is something that is pretty unique to our situation. Take the wall thing for example: we were on a sprint to Washington for an event that we absolutely could not miss. For this reason, my stress and anxiety were magnified quite a bit more than it would have been on a normal family road trip. One thing we all have in common is that no one likes setbacks and no one likes spending money on unplanned repairs. Speaking of expense, I’ve found that I’ve become quite handy since going full time! Many people ask if they should buy the extended warranty… maybe that’s a blog for next week. What I can tell you is that we bought the extended warranty mostly out of fear of a large mechanical failure which, thankfully, we have yet to experience [knocks on wood]. We did use the warranty on some smaller house repairs during the off-season, but honestly we found ourselves buying parts and installing them ourselves to save time. It just wasn’t worth the hassle of dealing with wait times and down times without our home. We also burned right through the mileage and expired the contract well before the three years’ time. Future blog spoiler alert: My advice to full-timers would be to pass on the warranty. In addition to saving time and money when you do work on the rig yourself, there’s a great deal of satisfaction and security in knowing that you completed the task on your own. The more things I fix on the coach, the more confident I am in diagnosing and fixing it when something does go wrong. Since going full-time I’ve suddenly become at least somewhat adept at plumbing, woodwork, painting, mechanical diagnosis and repair - even my self-proclaimed worst enemy, electrical diagnosis! That’s right, not only can I use a multimeter, I can trace and rewire shorted wires! I even added some outlets and installed LED strips throughout the living space in our rig. Final Thoughts So, while full-timing in a motorhome hasn’t been all sunshine and rainbows, it has certainly kept us on our toes. Would we do it again and would we buy the same rig? Honestly, I wouldn’t do a single thing differently. We got the best floorplan possible for us and we got a great deal on it at purchase. I think one thing we have learned is that our travel schedule and life structure require a more “substantial” rig, so we are shopping for a semi conversion with a big trailer (thanks to our business, not our family needs). I guess you could say we’re really going all-in. But the ol’ Outlaw has been an excellent partner as we’ve traveled 45 of the 48 continental… and the plan is for Rumble to take us through all 48 before we move on to the next one. The bottom line is, if you’re planning to go full-time and you find a floorplan that suits your family’s needs, go for it! Just be prepared for the unexpected at all times and set aside a few bucks for some impromptu repairs. Hey, I never owned a house that didn’t need attention and a few thousand bucks every now and then! Well everyone, it’s February 22, 2022 and we’ve been back in the RV for a couple of months now following its month-long visit to Camping World in Stafford, Missouri. In Part 1 of this blog series I talked a little bit about the Camping World corporation as well as my past experiences with the chain. I also mentioned that I was so tired of reading comments from people bashing the company that I decided to make a fully documented video series which involved a large repair, an extended warranty and insurance company. This would help answer the question once and for all: “Does Camping World suck?” These blogs are laid out in a quite different way than our YouTube videos which visually document the experience as well as my opinions. There are also four parts to the video series which include a lot of communication from all parties involved as well as photos of the work, capped off with an overall summary of Camping World and its CEO Marcus Lemonis. I recommend checking those videos out here after reading these blogs!  Initial contact and drop off My first contact with Camping World involved a stop at the Wichita location (Gander RV) per my insurance company’s request. I have to stop here and mention that the Wichita location could not perform the roof repairs as they had no personnel capable of doing so. Fortunately, I met Kerry Stevens there. Kerry is the Service Manager for the Stafford, Missouri Camping World location and he happened to be in the Wichita store that day. Kerry came right out and looked the RV over and gave me an honest opinion about all the items I needed. When he found out we were full-timers he told me if I wanted to make the 4.5 hours trip to Springfield he would make sure we were taken care of in a timely manner. As a former Service Manager myself I really appreciated Kerry’s time and attention. I also detected a real sincerity in his willingness to help. He gave me his personal cell phone number and told me to contact him anytime. With that, I decided right there in the parking lot that I would be making that drive to Missouri and allowing Kerry and his team to do the work - not only because I felt good about him, but also because I wanted to put them to the test. After all, this was going to be a rather big job: ten repair items involving the extended warranty company, several diagnosis jobs that I couldn’t seem to figure out on my own, and finally a complete roof replacement due to storm damage. Over the next couple weeks I worked to get an estimate from the insurance company and figure out logistics on our end. After all, we were essentially moving out of our home for the duration of this repair. Thankfully we are blessed with amazing friends and family! We first arranged to stay in Dallas with our long-time friend Grant, and after a couple weeks there we came back to Wichita where Tosha’s brother Josh and his wife Dani allowed us to move in with them. While this was very much appreciated, it was still a stressful situation for our family. More on that in a later blog. Anyway, as we were working on the above logistics I also contacted Kerry and asked him if we were still good to bring the motorhome to him for this job. By this time we were running out of time. Our plan was to be on the road by Jan.1, 2022 but we were now into December. Knowing that this would be at least one month’s worth of work to be completed, I was hoping for an appointment date that wasn’t too far out. Kerry responded to me immediately with a phone call and asked how soon I could bring the RV. That was on Friday December 3. On the morning of Monday, December 6th we rolled into the lot at Camping World in Stafford. The drop off with Kerry and our Service Advisor, Kami went seamlessly and we were back on the road in no time, headed to Dallas. Given my experience in the repair industry as well as with RV shops, I did not expect to hear from Kami or Kerry for at least a week. To my surprise, just three days later Kerry contacted me with a list of diagnosis and news! This surprisingly prompt and thorough communication continued throughout the duration of the visit. Whereas Kami promised at least one update per week, I was hearing from them almost every other day.  Running into snags And so, everything was rolling along smoothly at the shop yet there remained some loose ends. First, there was a list of items to diagnose and submit for extended warranty coverage. Second, we had a huge question mark in regards to the roof. Because the damage to our roof was beneath the membrane (a dent), the insurance company originally wanted to pull the membrane up, repair the dent, and stick it back down. I knew that wasn’t going to work (and so did everyone else) but we all agreed we would need to give it a shot first then file a supplement as needed. A supplement occurs when the shop requests more money from the insurance company to perform additional repairs found during the visit. Here’s where we ran into some turbulence. Not surprisingly, the roof membrane would not go back into place. The insurance company denied the $5000 supplement, leaving us holding the bag. In the meantime some of the intermittent issues we reported to the extended warranty company were not acting up while the RV was being checked out by their inspector. Two of these issues - the generator stalling and the rear air conditioner freezing up - are a pretty big deal for us since we do so much boondocking in hot areas. Lastly, the side glass which I ordered directly from Lippert broke during shipping. UPS denied the claim due to “insufficient packaging”, which was unbelievable given that Lippert packed the glass so carefully and thoroughly. Having heard all of this in a matter of just a couple days, my stress level was increasing rapidly.  Diligence from some saves the day Thankfully we had some good people on our side. Lippert Industries decided to expedite cutting a new window for us and ship it out to us at no cost. Kerry and Kami at Camping World pressed on with the insurance company and tried their best to get our roof supplement covered. Only the day after we picked the RV up and paid $5200 out of pocket did we find that the supplement would indeed be covered thanks to the insistence of Camping World staff. To say this was a relief would be an incredible understatement. I want to take a moment here and say that communication from Kerry throughout this process was absolutely awesome. He and I exchanged dozens and dozens of text messages, several emails and many phone calls during the course of the visit. I should also mention that given my experience as a Service Advisor and Service Manager, I know how frustrating it can be to have a customer bother you for constant updates. As such, I’m a very “quiet” customer. I don’t hound for updates or ask for a whole lot of information. I leave it to the shop personnel to be proactive and do their jobs without me hovering. With this in mind, I hardly ever contacted Kerry or Kami on my own accord. Almost every time we communicated it was Kerry reaching out to me! The amount of communication and correspondence from Kerry and Kami truly made me feel like I was their only customer. I honestly wondered to myself at one point whether they were onto me. Did they know I was secretly putting them to the test with the intent of publicly broadcasting my findings? Were we getting preferential treatment? I’m quite confident that this was not the case. In fact, it was only after picking up the RV that I spoke to Kerry and asked whether I could interview him for the channel and use our phone conversations in the footage. He was surprised to hear that we had a channel, and just this morning I received a text from Kerry letting me know he saw our first video. I truly do not think Kerry knew (or cared) about our YouTube channel or webpage. Even if they did know about Lackey’s Be Trippin’, at the time of this writing we’re not exactly a household name. I doubt our handful of followers would have persuaded them to roll out the VIP carpet. 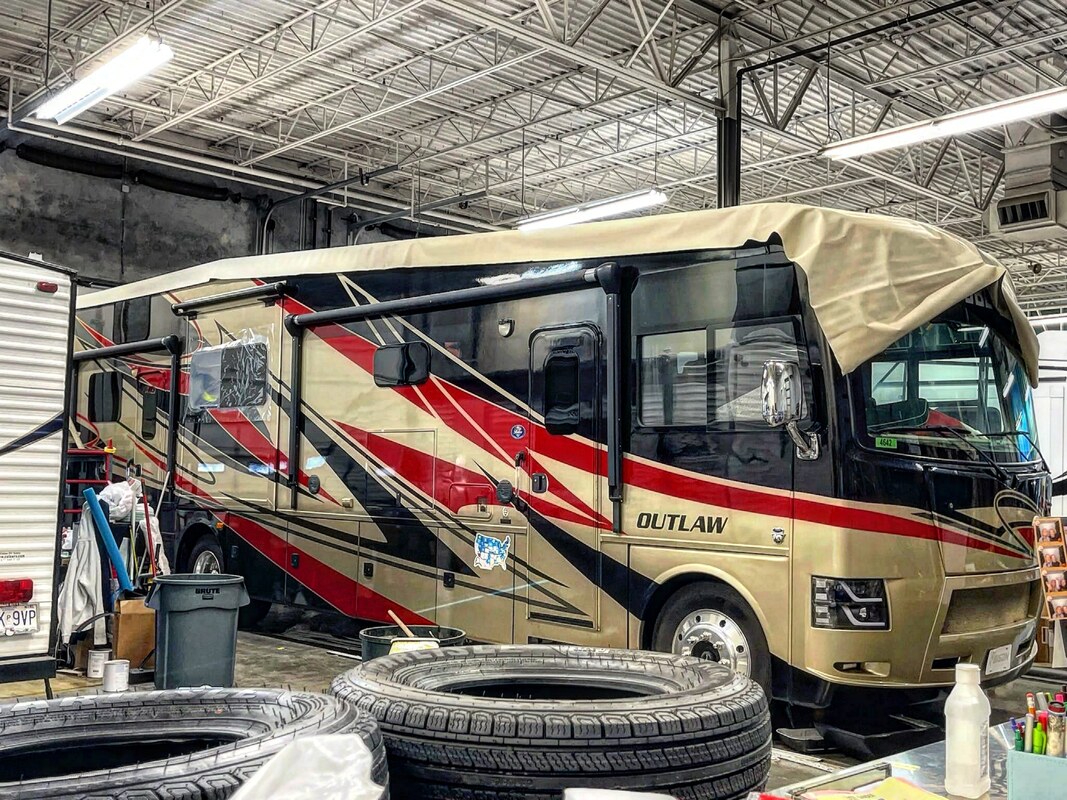 This experience vs. thousands of others My experience at the Stafford location was overwhelmingly positive. I must say after pick up we found two electrical issues on the rig: one was not a surprise, as Kerry did inform us that the thermostat/front AC control board was acting up intermittently while in their possession but they could not reproduce it for the warranty inspector. That component was indeed malfunctioning when we picked the RV up. The second item was a bit of a surprise, as the outlets tied to the inverter were not working. I did manage to get the HVAC to reset via static discharge (pulled the fuse and reset it), but I found that the inverter was left unplugged (likely when the shop replaced the converter in that same area). The only complaints I have with the roof job are some paint missing where the gutters were pulled off and reattached on the sides of the coach, some slight wrinkles in one section of the roof edge, and a missing gutter spout on the passenger side. Two of these three things are minor and I’ll touch them up myself, but the wrinkles in the edge may require a future visit if they don’t lay out on their own. These nitpicks aside, the overall job looks great and it’s watertight! We’ve seen a LOT of rain (even ice) since picking the Outlaw up and it’s performed just fine. Everything above being said, I must remind you that we rushed Camping World to complete the job so we could get back on the road. Hold ups from our insurance and extended warranty company hindered the shop’s progress but they still did a lot of work in a short amount of time! Had we allowed them another day or two to shakedown and recheck all their work I’m confident the small issues would have been found and resolved. So overall, what is my impression of this individual service center following a BIG $10,000 repair visit? Frankly, I was pleasantly surprised and if I’m honest - impressed! Now the question is, am I an anomaly? 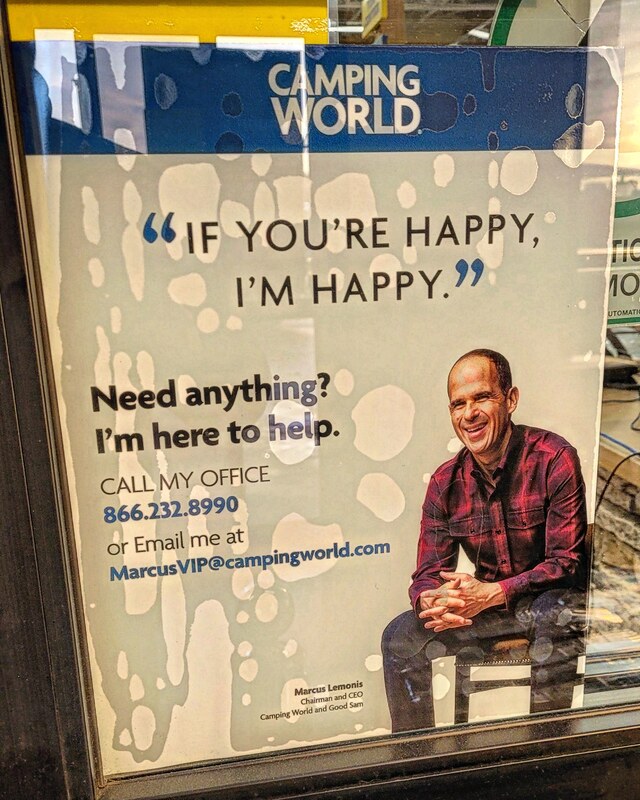 The company (and the guy) people love to hate Chances are if you’re reading this you’ve already read some negative opinions of Camping World or Gander RV, but if you’re a new RVer Camping World is probably the first name that comes to mind when you think of an RV store! On the surface, it’s pretty crazy to think that veteran RVers have such a different opinion of this company than novice RVers do. But really, it’s a great indicator of how things are going very wrong in the Camping World company as a whole. Let’s dive into that. Type “Camping World” into the search bar of Facebook and see what page suggestions come up. The top two are likely “Camping World -The Awful Experience”, and “The Camping World Experience”. Each of these pages has 3000-4000 members, most of which are quite vocal about their disdain for the CW/Gander brand. Hop over to YouTube and type “Camping World Experience” in the search bar. You’ll find page after page of videos outlining people’s experiences with CW and - spoiler alert - they’re mostly all bad. The discussions I’ve had with folks in some of these social media pages is enough to melt your brain, trust me. I won’t be outlining those conversations here but I do touch on them in a couple of our YouTube videos, so check those out if you’re curious! What I will tell you is that the hate, the venom and the vitriol some of these people spit at Camping World (and anyone who shows even a shred of positivity towards CW) is so strong and ugly that it’s what ultimately drove me to make myself a guinea pig with this large repair and all the accompanying video/written documentation. To be completely honest, I started this whole thing hoping that I would have a perfect experience so I could come back and rub it in the haters’ faces: “Look suckers Camping World doesn’t suck so bad after all!” With the above in mind, I took the RV in and had a great experience… only to realize maybe Camping World does suck. While the RV was in the shop I tossed out a few “bait” posts on the anti-CW Facebook pages which garnered a ton of attention and lots of very interesting discussion. Some of these comments were really geared towards one person in particular: CEO Marcus Lemonis. This got me thinking… Even if my little experiment goes perfectly, would it be enough to argue that Camping World doesn’t suck? At that point I shifted my focus from my specific story to researching all I could about Lemonis and the entire Camping World conglomerate. As an entrepreneur, I’ve been somewhat familiar with Marcus Lemonis thanks to his CNBC show The Profit, in which Marcus steps in and assesses struggling businesses before offering investment and advice to the business owners. As a viewer of his show, I’ve often struggled to figure this guy out. My initial impressions of this guy during the first few episodes were that this guy has a lot of money so clearly he isn’t stupid, however something was off. I was never able to put my finger on it but I continued to watch. After just about half a season I started to realize that while Marcus Lemonis is NOT stupid, he’s not exactly… brilliant. And he might be a little slimy. That was before I even knew he was the CEO of Camping World. Once I figured out the guy from The Profit was the CEO of Camping World, I began reading everything I could about him. What I found was pretty eye-opening! Accusations of hostile takeovers, public dressing-downs of his partners, lawsuit dodging… Some people have gone so far as to compare Lemonis’ practices to “mob tactics” by using a “bust out” approach. In a bust out the instigator buries a business in debt with investments, only to take that business from its original owners when they cannot possibly repay the debt. It’s a strong accusation, I gotta say, after reading some articles and recounting some episodes of The Profit… it adds up. In between all the reading I went back and watched some past episodes of The Profit. Interestingly (and without intention) I found myself looking at the show from an entirely different perspective. Remember earlier when I said Lemonis isn’t stupid but he might be a little slimy? Boy does that ring true when you know a little more about his backstory! One episode in particular saw Lemonis doling out tens of thousands of dollars to a pair of desperate business owners while demanding that they change their business model. This probably wouldn’t be a big deal in-and-of-itself except for the fact that he admitted at the start of the episode that he did not know anything about this particular industry. When the couple rebut Lemonis’ demands he simply reminded them that he was now a primary owner in the company and they were to do as he instructed per the handshake deal they struck prior to the stroking of the first big check. He wrote many checks over the course of that episode and by the end of it I wondered to myself: “When and how are these people possibly going to be able to repay all this money to him?” Lemonis is a businessman first and foremost. That’s his MO, and we have to respect that. He’s not here to make friends nor is he handing out checks on a charity basis. That being said, these shady business dealings aren’t limited to the TV screen. The most public and blatant example involves a woman named Gigi Stetler and her company RV Sales of Broward. There are a ton of moving parts to the whole story which started when Stetler politely declined a Camping World offer to purchase her business. From there, Camping World resorted to some brow-raising tactics in an attempt to choke off Gigi’s business and damage her long-established relationships with marketing partners. It’s a big ugly mess and I’ll allow you to explore that in your own time via the Google machine. Suffice it to say, it doesn’t lend much in the way of “positive Camping World vibes”. While I definitely want you to read up on the Camping World vs. Stetler case, more than anything I would love for you to watch Marcus Lemonis’ deposition on the case on YouTube. It’s a couple hours’ worth of smirks, snarky comments and laughable attempts to deflect, but if you grit your teeth and wade through it you’ll find more than enough material to make a solid judgment on Lemonis’ character. I recommend a strong drink (or two or three) as well as a little background music to make the whole thing more bearable. Wait even better - go to our YouTube page and watch Part 4 of our Camping World series where I highlight many of the most ridiculous moments from the deposition! It will save you the hangover. 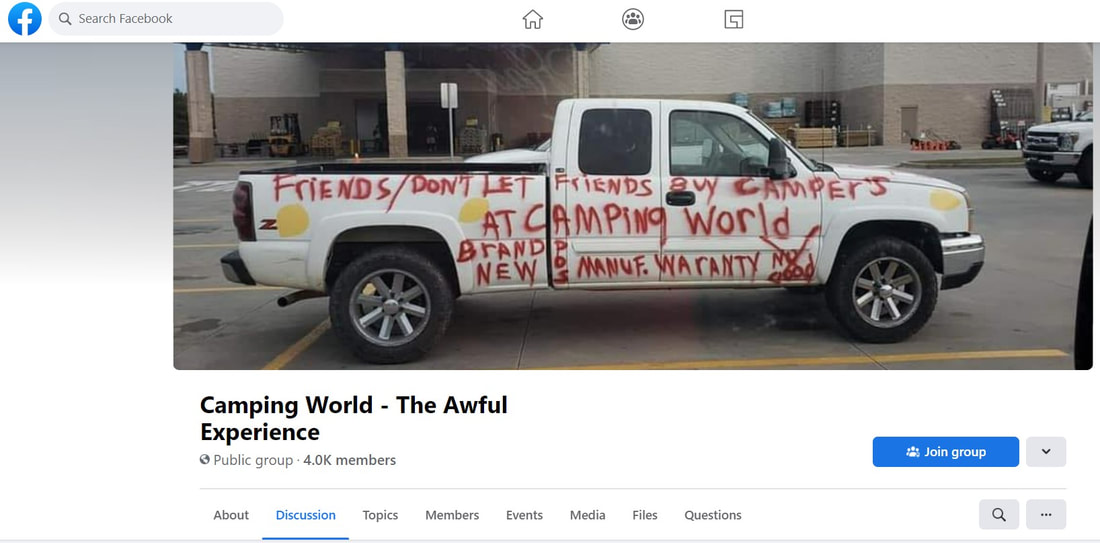 Cancel(ling) culture All this research opened my eyes to what is happening to these stores on the ground level. Keep in mind I worked in the auto industry for 20 years and I’ve found that most of my knowledge translates directly to the RV industry. I also have the unique perspective of visiting not just one or two CW stores local to me, but stores across the country! What I have found is that while the experience naturally varies from location to location, most of the time I get nothing more than a sense of mediocrity following my visit. Staff seems just helpful enough, yet never truly excited about their job. There’s no “soul” to the place - I’m unsure how to describe it other than saying it feels like an “RV WalMart”. I leave the store neither offended nor blown away. As with anything, there are of course exceptions to this sense of mediocrity. In the case of an overwhelmingly positive experience look no further than my last visit to the Strafford, MO store and the excellent customer service we received! On the negative side I’ve dealt with complacent, untrained sales staff (Oklahoma CIty location) and rude parts counter people (in Wichita). Given my level of experience around dealerships from family-owned to corporate conglomerates, I think I can tell you exactly why CW and Gander RV have garnered such a reputation for mediocrity and outright poor customer service: Marcus. Let’s first consider the inner workings of a well-run, family-owned RV store: At the top of the business you typically have a mom & pop, or a very small group of owners calling the shots. Managers have typically worked at the store for a considerable amount of time and were likely promoted from within. Employees are familiar with the people who run the store at the highest levels and they understand what is expected of them. Employees are rewarded and recognized by the upper management and ownership for their efforts which increases employee morale and subsequently, retention. In the case of a big conglomerate like CW, we don’t have much definition at the top levels of management with the exception of Marcus Lemonis - you know, the guy on TV. The one who has his smiling face plastered all over the stores. Management comes and goes in many cases, sometimes being cycled out with people who have no prior RV experience. Employee retention is low due to mediocre pay and praise. And it all flows from the top down. To put it frankly, Marcus Lemonis has put himself in a position to be a “CEO with a face”, someone that people will immediately associate with his big chain. Unfortunately, to do that successfully, said CEO must have his or her ducks in a row pretty tightly. For instance, if you’re going to put a sign on the door of all your stores with your face and the statement “If you’re not happy, I’m not happy. Call me and I’ll make it right”, you sure as hell better pick up the phone or respond to an email when I reach out. I can tell you from personal experience, that doesn’t always happen. So it should come as no surprise that when I reach out to the General Manager of a store via both phone and email, he doesn’t get back to me. When I try to get hold of the Service Manager to no avail? I can’t expect a callback. After all, his bosses apparently don’t have much sense of urgency so why should he? To recap; here we have a massive company with what I can only assume to be an egotistical, money-hungry sleazeball at the helm. To make matters worse, thanks to his ego and the desire to be in front of every single customer, Lemonis proudly stamps his face on all the doors and touts that he’s here for you. When those customers do reach out, the best most of them ever get is an assistant who doesn’t have any more answers than anyone else did in the store. THIS is where people start to get angry. That guy at the top just lied to them. It’s Customer Service 101, and Marcus is failing before he even opens his mouth. And this is the fundamental issue with most CW locations: The culture of the entire company is broken. It’s a perfect example of the way big bad high volume dealership chains do business compared to mom & pop stores and frankly, it’s laughably short-sighted. It takes a very dedicated and passionate manager (or team) to break that cycle and protect an individual store from an otherwise broken corporate culture, but it is possible. Again, I point to the Service Department at the Strafford location as an example of a good manager stepping in and pushing his store’s customer experience beyond mediocre to great! The greater challenge might be protecting the individual store from the reign of those corporate bean counters over the long term and sustaining a uniquely positive atmosphere. Remember when I said Lemonis is a businessman first and foremost? Well, that’s the one element of culture that does ring true in Camping World from the top to the bottom. Ask anyone who’s worked at CW (or a large dealership chain for that matter) and they will tell you it’s long hours, high on pressure and low on praise. Not exactly a breeding ground for the warm-and-fuzzies, it doesn’t take long for this type of atmosphere to deflate even the most customer service motivated employees. When customer service takes a back seat to the numbers, all is lost. There’s an old saying in the sales industry: “You can shear a sheep for a lifetime, you can only skin the sheep once”. In Part 1 of this blog series I talked about how CW gets their “new blood” after driving away existing customers. It’s an interesting situation - CW seems to care more about hitting “home run” transactions off of newbie RVers who don’t know any better rather than taking care of them in such a way to retain them as long-term customers. Until they change their ways, Camping World is in the sheep skinning business. 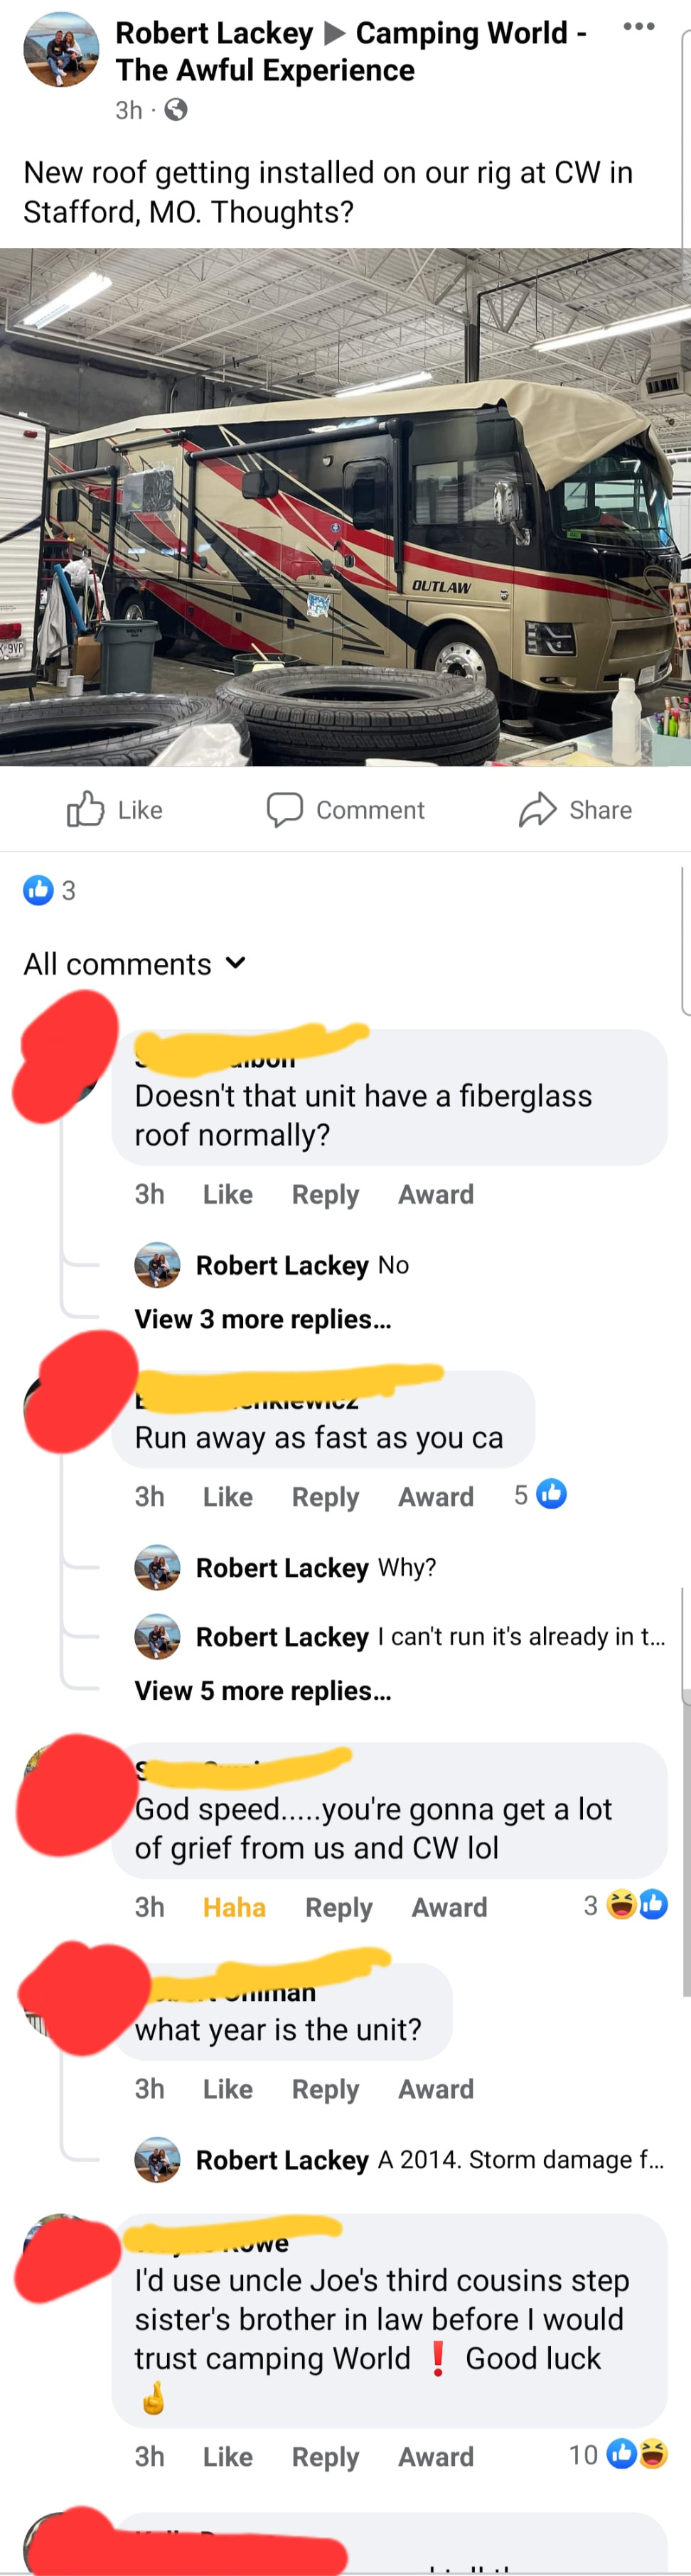 So does Camping World suck? I wavered a lot on this answer as I produced my content over the past few months. In fact I remained undecided about it right up to the hour in which I shot part 4/4 in our Camping World YouTube series! In the end I sat down, looked through all my notes and realized my overly positive experience was indeed an anomaly. I came to a slow realization: As a whole, the entity of Camping World does suck and it all starts with Marcus Lemonis. Full disclosure, I did come into this project expecting to expel the trolls and the haters! I wanted so badly to proclaim once and for all that Camping World had an undeserved bad rap, yet I still couldn’t bring myself to do so. Camping World has indeed made the bed in which they lie. I’m not big on negatively labeling large entities or groups, so it is awfully annoying that I have to eat some crow here and tag Camping World as a bad company. Despite this, it’s important to keep in mind there are still good experiences to be had in CW stores. Outliers like Kerry and the team in Strafford are proof that you can find a diamond in the rough, and when push comes to shove every employee in each of these stores is simply trying to earn a living. Will I continue to do business with Camping World? Yes, at least in limited capacity, and maybe you should too. After all there is a CW in almost every big city and I know I can count on them to have the part I need in stock. Should that part fail when I’m halfway across the United States, I know there is another Camping World nearby for me to return the part and remedy my issue. I will return to the Strafford location for service. Purchasing an RV at CW? Nah, I won’t touch that one. Hopefully in the near future there is an RV revolution of sorts and Camping World sees the error of their ways and rights the ship. Many people (myself included) feel that the popularity of the RV lifestyle combined with the low quality/poor service found throughout the industry is creating a vacuum which is ripe for disruption. Camping World could actually get ahead of the game and be that disruptor… Unfortunately I’m afraid the guy at the helm of this behemoth won’t be able to see past his own ego and antiquated business sense to realize that’s even an option. It’s probably going to take a new CEO to turn this thing around.
It was a beautiful Sunday morning. Our youngest daughter Edith and I were engorging ourselves on caramel-drizzled, cornflake crusted french toast at our favorite brunch spot while Tosha nibbled on her avocado toast. Most importantly, there was a really good special on mimosas. After mimosa number three for me, we somehow got into a discussion about pets. It had been a few years since we’d had any animals in the house (our last few pets being cats who were tragically picked off one-by-one by roving coyotes), and Edie had been lobbying for a rabbit.
Frankly, we didn’t know the first thing about rabbits. I knew I liked them a lot because they were adorable, plus I figured they probably didn’t require much upkeep or attention. Put it in a cage, give it food and water and walk away… right? Despite our lack of knowledge or even research, on that Sunday morning - our judgment impaired by champagne and OJ - we made a commitment to Edie that she could have a rabbit. Hours later, we were at the local farm supply store picking a fluffy little harlequin bunny out of a litter. Edie was smitten with them all at first sight but she had her eye on one bun in particular and she scooped him out of the steel tub. I inquired with the kid helping us about what we may be getting ourselves into: “How big will it get?” “I donno.” “Okay, how long do these things live?” “I’m not really sure, people just bring these things in and we sell ‘em. Most people buy them to eat or feed their snakes and stuff.” That last sentence was all it took for me to blurt out “We’ll take it”! We proceeded to go on a buying spree, loading a pen, litterbox, feeder, water bottle, hay, pellets and litter onto a cart before heading home as a newly (hastily, ill-prepared) rabbit family. 
Edith with "Bella" on April 28, 2019, on our ride home from Atwoods.
It’s nearly impossible to identify the sex of a tiny rabbit but I gave it a go anyway. I turned the little… erm, thing, upside down and spread all the fur out of the way. “Gotta be a girl” I said. Edith disagreed. “He can’t be a girl! He’s definitely a boy! He has a mohawk!” We all laughed but she was awfully convinced. Finally she gave in and came up with a girl’s name: Bella.
Since we were in our house at the time, we placed Bella’s cage near the foot of Edie’s bed. Bella stayed in the cage most of the day although we would get her out to play quite frequently. She grew fast, but she learned potty training very quickly too. The first months with Bella were going great - we really enjoyed the little personality of this animal and found that she was easy to care for. She didn’t stink, she didn’t eat too much, she didn’t bark or meow at all hours of the night, and she didn’t take up too much space! Heck, even if she pooped all over the house you just picked up the cocoa puffs and tossed them in the trash! Bella was adapting well and we were in love with her. Then the life changes came. 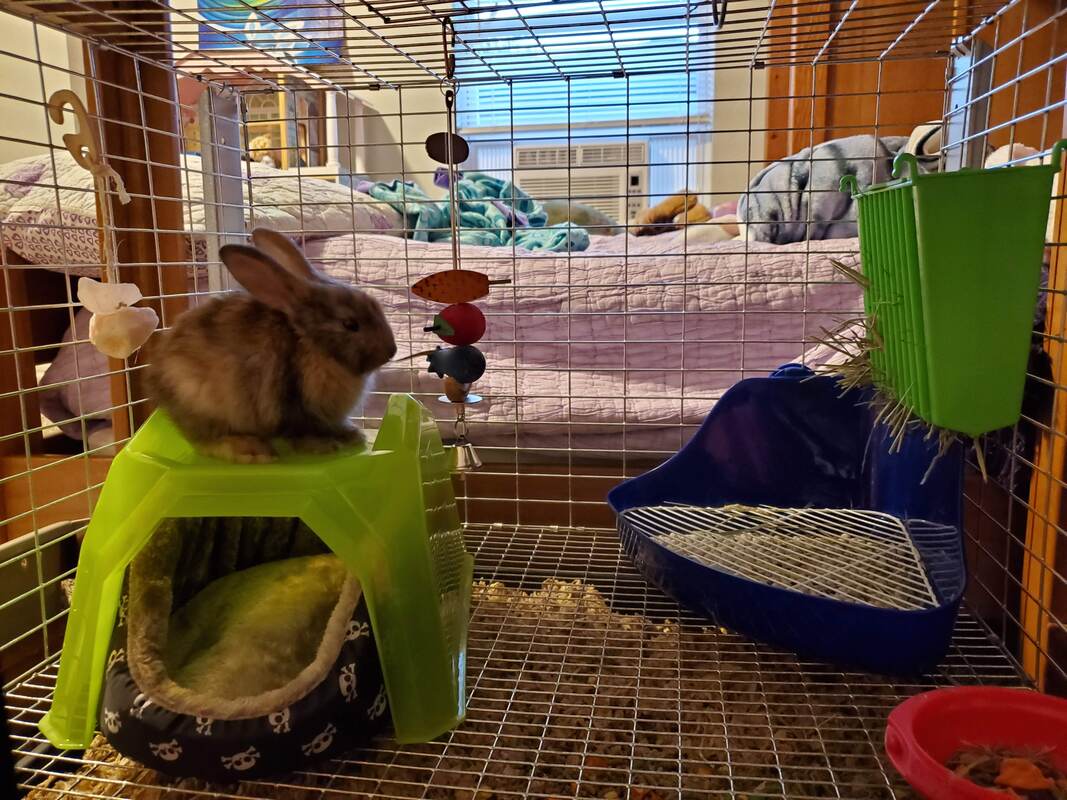
Time to Travel
A few months into our rabbit journey it became evident that we were going to begin traveling full-time in an RV. There were, of course, so many facets of our lives to consider when we made the decision: school, possessions, logistics, a mailing address, what to do with our house, which RV to buy, the list goes on and on… oh and what about Thumper? WAIT! Who’s Thumper? Well, turns out Bella got a little infection in the downstairs region and when I went to check her out I discovered that the boys had dropped, if ya know what I mean. When we broke the news to Edie she very nonchalantly pointed out that she had already told us he was a boy and knew all along. She dubbed him Thumper almost immediately. That name has since evolved into several variations including Big Thumps, Thumps, The Dude, Potato, The Loaf, and four or five others I can’t think of offhand. But anyway… Sad to say, with everything happening in such a short amount of time we really didn’t have much time to think about Thumps or how he would take to the smaller space and all the travel. Frankly I didn’t think much about it at all. In my mind we would be riding in luxury, gliding down the road in our motorhome with all the civility and grace of a 747 cruising at altitude. Boy was I wrong. Our Thor Outlaw motorhome is, shall we say, not comfortable at speed. It’s loud - wind noise, tire noise and engine noise all cumulate in a symphony from hell. It’s also bumpy and wallows all over the road especially in windy conditions, which means everyone on board is subject to sudden nausea at any given time. When Tosha and I flew down to Florida and drove the RV back on a 25-hour trip we suddenly realized this might be a stressful living situation for The Dude. The good news is we did think a lot about where Thumps would stay in the rig. Because our RV is a toy hauler with a garage area in the back, we simply placed his cage in there. And since the garage floor is a rubber mat, we would leave the cage open and allow him free range of the entire back area. This was actually a big upgrade from his current “90% cage” lifestyle. We also had time to acclimate Thumps to travel. We took him on some car trips to Kansas and Texas during which we found that while he didn’t freak out, he wasn’t necessarily stoked about it either. We just needed to make him as comfortable as possible and hope for the best! 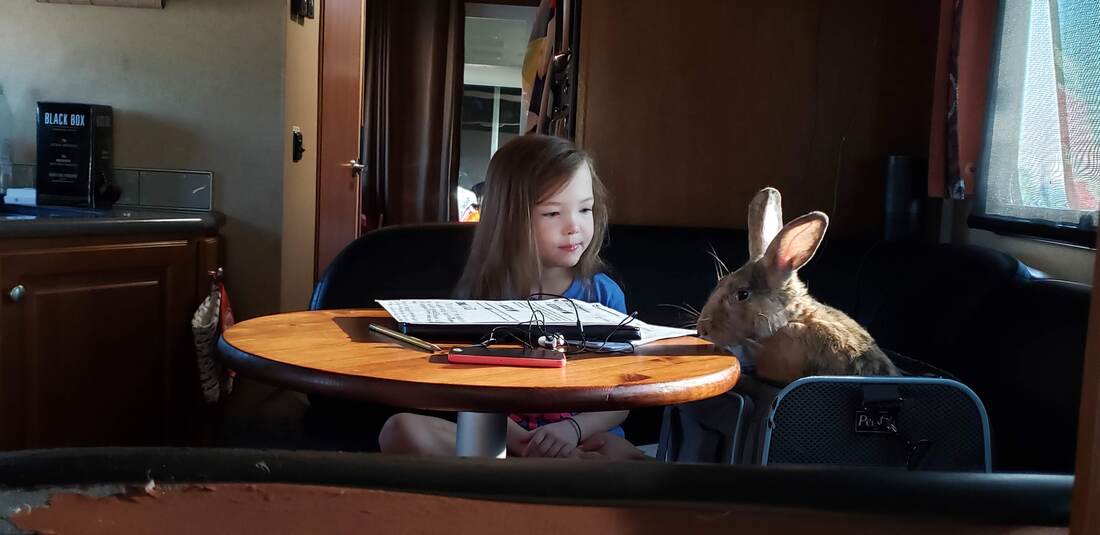
Evolution of the Accommodations
We’ve now been 2.5 years full-time in the RV with Thumps along for the ride. To say that we’ve learned A TON would be an understatement! I actually feel bad knowing that Thumper’s living conditions could have been so much better all along. Whereas we started with his metal 3x3’ cage with a metal grate floor and small gravity straw water bottle, he now has almost 100% free range of the whole RV! These days we’ve done away with the cage completely and instead use a full size litter box filled with wood pellet bedding and fresh hay. We buy $1.69 scrap carpet rugs from Walmart to place around his area which he really enjoys, and once they get too gross we simply toss and replace them! He also has a full size food dish (with a new diet of .5 cups of pellets/day) and automatic fresh water dish. Since his cage was his safe haven (albeit not a comfortable one) we keep his soft mesh carrier on the floor to give him some privacy when he wants to retreat. This is also helpful when we go on trips in the pickup, because he still feels like he has his “home” going along with him. We also discovered pretty quickly that the garage area is the least insulated - and therefore loudest - part of the RV when we’re on the road. The cage was rattling loudly and the garage door tension spring clangs around over every bump. It’s a stressful area even for a human to be in! I did some soundproofing in the garage but we also try to convince Thumps to come up front during travel. Alas, he still prefers the back garage. It’s just where he feels safe. When it’s very hot he will sometimes lay up front near our seats, soaking up the dash A/C. 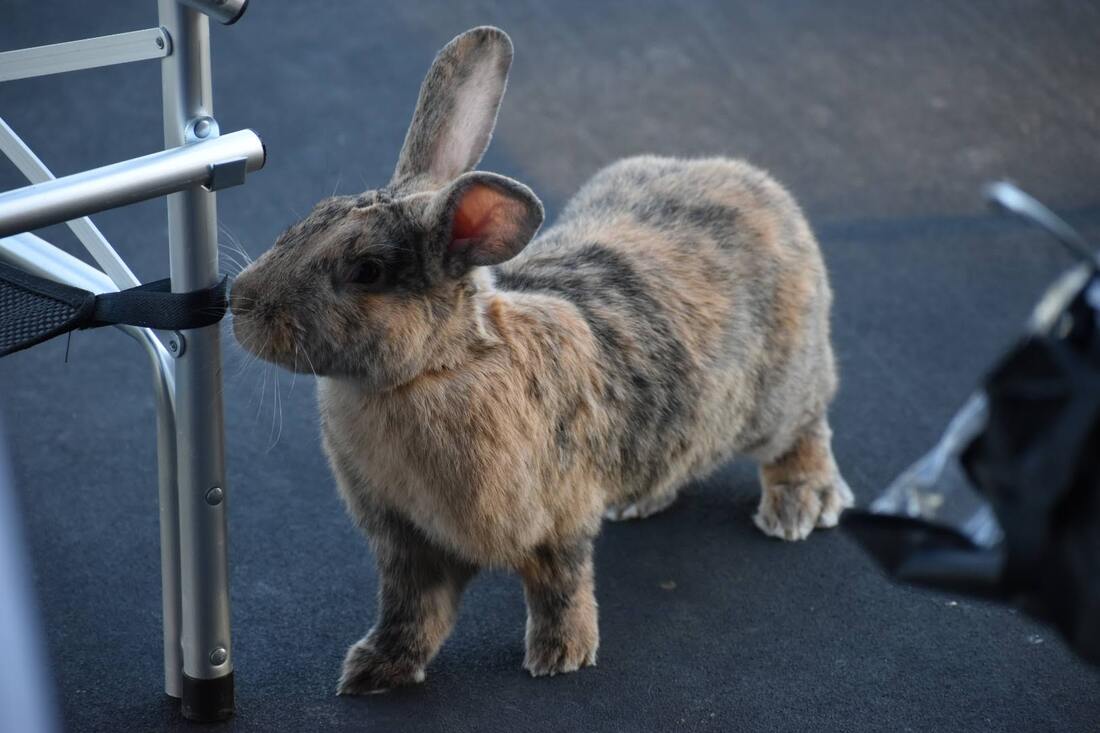
Cons of the RV Bunny
By this time you may be thinking about running out and buying a rabbit of your own to accompany you on your travels. It’s not quite that simple. Take it from us, you really need to consider how you plan to house your bunny (cage/free roam/combination?) and where you will put said accomodations in the rig. If you have a trailer setup this may be an especially difficult situation since you’ll either need to keep buns in the trailer during travel (unsafe and maybe a little cruel since buns will be alone and you don’t really know how loud and bouncy it is inside there) or up in the cab of the truck. The back-and-forth of going from the cab and trailer can create stress in-and-of-itself, although if you don’t move camps very frequently this is totally doable. So you’ve got the bunny accommodations figured out! Now what can you expect from your RV pet? Well, they’re not perfect. In fact, they can be quite destructive little punks! Rabbits are constantly chewing, and they will find their own things to satisfy that need especially if they’re left without hay or food! [A timely note, as I was typing that sentence I had to stop and remove Edie’s drawing pad from Thumper’s mouth before he digested her artwork!] The biggest issue is that many rabbits (ours included) have a real taste for rubber and wiring. As you may know, RVs are full of wires and all of them are pretty dang important! We’ve had some wires under our dash snipped by Thumps, and our emergency brake pedal has felt the wrath of those chompers too (although that’s just superficial damage). Some rabbits also chew woodwork such as door edges, cabinetry, baseboards, etc. We have a few chomps out of our wall corners and cabinets here and there but thankfully our boy doesn’t seem to care too much for wood. The destructive nature of rabbits is certainly something to be aware of however it shouldn’t be a dealbreaker. Owning a rabbit in an RV is no different than owning one in a house in that sense - you simply have to be a diligent rabbit parent and bunny proof your home as much as possible. Keep toys, hay and chewables available at all times. Gate off any areas where the rabbit might do some especially serious damage (such as a driver’s area or under a power stair). Finally, invest in a foldable panel pen (X-pen) which can allow you to put the rabbit outside. This will give them some much-needed fresh air and natural foraging time. I also cannot downplay the importance of spending time with your rabbit as much as possible. Rabbits are “colony creatures'' and crave family and attention (even if at times they act like they don’t want it). They get bored and lonely quickly, so be prepared to commit! The most important thing to remember when considering a rabbit in an RV however is their tolerance to travel. As I said we got quite lucky that Thumper tolerated travel in general, and even more so that he quickly adapted to the RV. Not all rabbits are this chill. In fact, the stress of travel can be so taxing on rabbits that it can make them physically ill or even kill them. By their nature, rabbits are a fragile and skittish animal who always thinks the worst of any situation. They’re built to be food and they know it. With that in mind, any new situation you would place your rabbit in should be done with great care. Adapting a bunny to the RV life should be done slowly and methodically. Only when you find the rabbit 100% comfortable with the RV and chaos of travel should you consider taking them along full time. 
Why I think a rabbit is the perfect RV pet
Every pet has a pros and cons list, but I feel that the rabbit’s cons are awfully light when compared to the return in benefits! We have friends who carry their cats and dogs around with them and I gotta say, that just looks like a huge headache. Both cats and dogs also take joy in destroying stuff but usually to a much greater extent than a rabbit. Cats’ litter boxes stink almost instantly (and they just love dropping a bomb in that freshly-changed litter!). Dogs have to be walked and let out to do their business all the time. Both of them eat a ton more food than a rabbit too, which means more expense. That’s enough with the comparisons to other animals - let’s focus on the underrated awesomeness that is the rabbit! Rabbits are super unique in the sense that they can be caged or free roam, they can be litterbox trained, and they have really neat personalities. They’re also not something you see every day! I’m always happy to see visitors’ faces light up when they poke their head into our RV and see Thumper. “OH MY GOSH YOU HAVE A BUNNY?!”... It never fails. Then they pet him. “OH MY GOSH HE’S SO SOFT!” We really enjoy sharing him with our friends and fellow campers. Kids all over the campground start to murmur about the family with the bunny and before you know it they all want to come see The Dude. I do have one more comparison to make to another animal: When people ask me what it’s like to have a pet rabbit, I always explain that it’s like having a cat. Like cats, most rabbits demand attention on their terms when they want it but don’t necessarily love it when you track them down looking for cuddles. Rabbits like to be in charge, too. In his own little mind, Thumps runs this household. He comes sliding in from the garage onto the laminate flooring like Kramer entering Seinfeld’s apartment, then he makes his rounds nudging each of our ankles looking for some pets or treats. *nudge nudge* Nothing from that hooman. On to the next. * nudge nudge*... You put your hand out to pet him and he forces his head deep under your hand, which is a rabbit’s way of saying “I’m the boss, now groom me”. And we always do. As a side note, I must say that our Dude is a huge stress reliever for me. I’m prone to an occasional panic attack but when I feel one coming on I just sit on the floor and pet our rabbit. If I sit cross-legged he will lay his head in my lap and enjoy the pets. He grinds his teeth lightly, which is a rabbit’s way of purring and my stress melts away. Again, when supplied properly rabbits’ litter does not stink. I’ve tried a lot of different things from cardboard to cedar (which is, come to find out, very bad for rabbits!) but I recently discovered wood bedding pellets thanks to a Facebook group and I’m absolutely floored at how well they hold down the pee scent. Not only do the wood pellets keep the bad smells down, they smell like fresh cut wood for over a week even without attention. Food wise, a half cup of pellets gets the job done along with a few handfuls of hay each day. 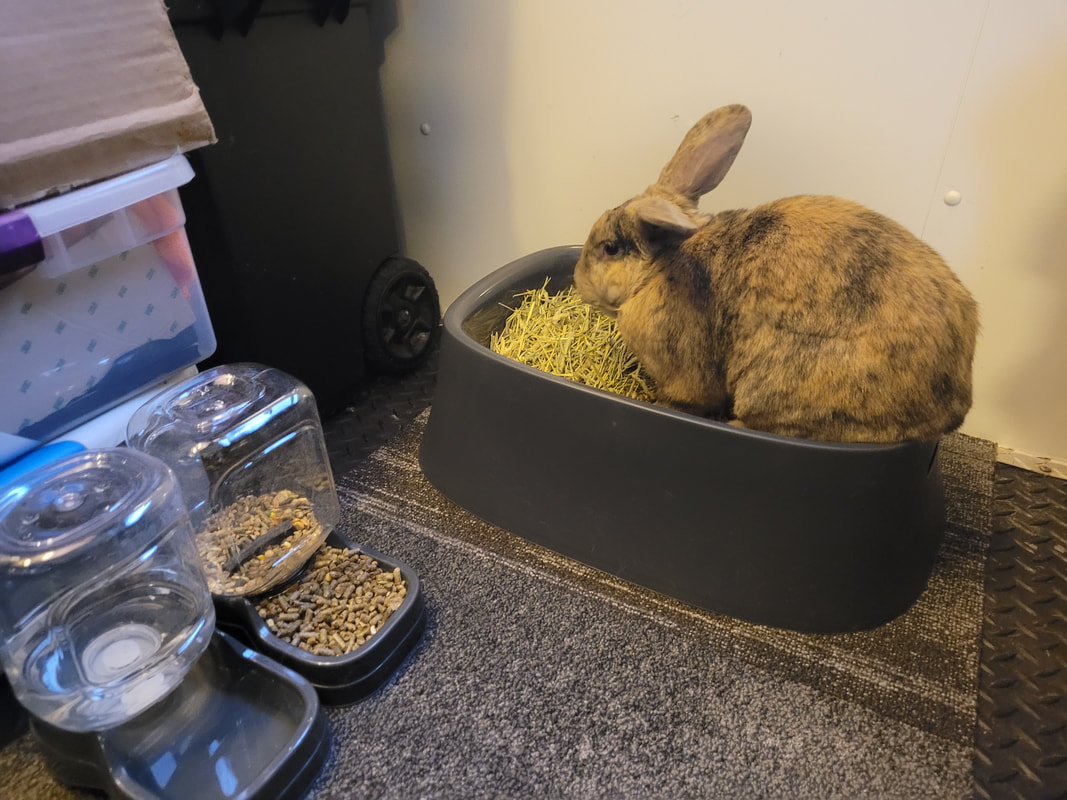
Choosing your bun
We highly recommend adoption if you are seeking a rabbit as a pet. There are many great agencies across the country which specialize in rabbits. Regardless of where you decide to get your rabbit you should try to spend some time around it before taking it home. Unless the rabbit is in very unfavorable conditions, it is best to acclimate the animal to you and your family before plucking it up and changing its life. I also recommend larger breeds for a few reasons: first, the larger the rabbit the more mellow the temperament (generally speaking). Second, there are lots of little nooks and crannies in an RV for a small animal to get into - some of which move! Imagine losing your rabbit in a slideout and unknowingly crushing her to death when retracting! Lastly, you can free roam a larger rabbit much easier than the smaller breeds which typically need a cage. Hopefully this blog was helpful in making your decision whether or not to try a rabbit as a pet in your RV! I’m not sure what we would do without Big Thumps clickety-clacking his way up and down the center or our rig every day. 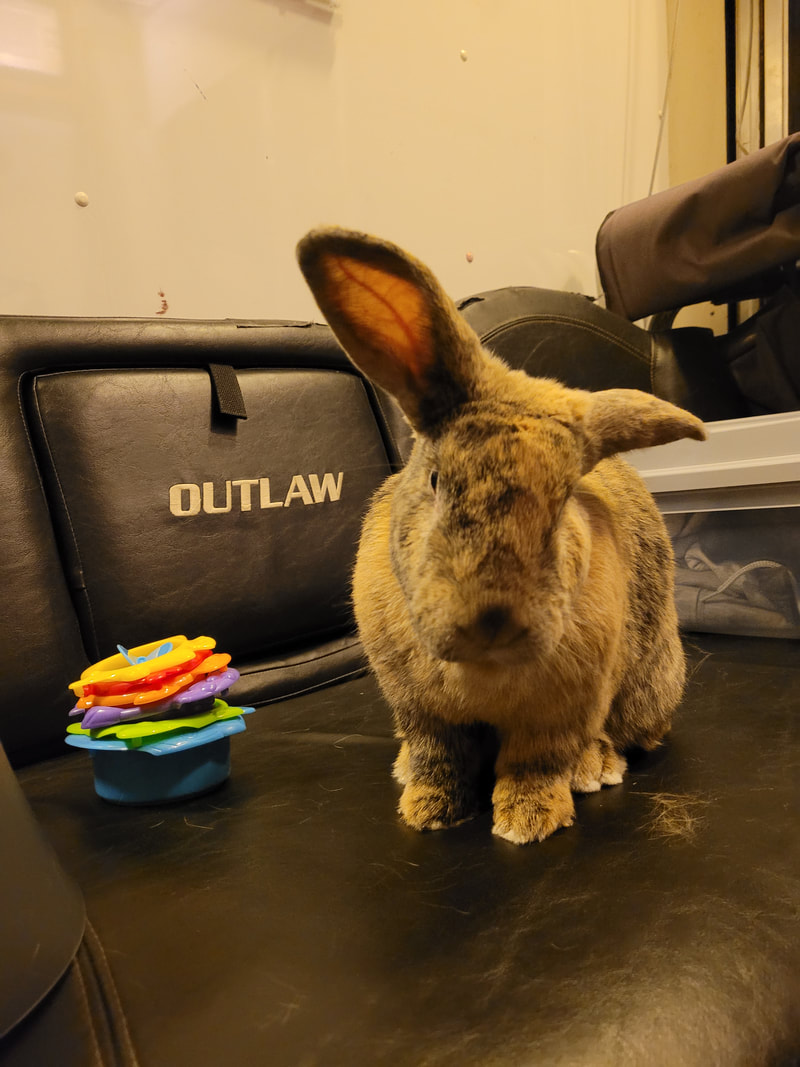
|